Available for every Visual Studio version since 2008, we are making no exception and release the new version 2.4.0 of our T4 Editor plus modeling tools for Visual Studio 2017!
Model driven development with code generation is a lifestyle here at tangible, so supporting our growing customer base and ever demanding community is our duty.
Let us know how you are using T4 to complete your software projects faster!
]]>Today we release the new Version 2.3.0 of our T4 Editor plus modeling tools. This new version includes Visual Studio 2015 support!
]]>For clarity reasons class models might be split up into multiple diagrams or several class diagrams contribute to the same data model. In this case one would like the T4 template that generates the data model to process all class diagrams at the same time. Unfortunately at the moment a T4 template can only access a single tangible ClassDiagram model using a <#@ TangibleClassDiagram #> directive, so one would have to create a duplicate T4 template for each ClassDiagram. This blog post covers how to process multiple diagrams without maintaining duplicate template code.
We are planning to include access to multiple diagrams in a future release of tangible T4 Editor and modeling tools.
The basic idea is to put the template code processing a ClassDiagram model file into a reusable T4 template file (.ttinclude), create a T4 template for each ClassDiagram and call the reusable template from within that T4 template. This results in a single file that needs to be altered in order to apply changes to how all diagrams are transformed. But still one would need to create a T4 template for each ClassDiagram that calls the reusable template. In order to avoid this we are going to use a “Meta”-Template: a T4 template that generates a T4 template for each contributing ClassDiagram using the previously created reusable .ttinclude.
Here is a step-by-step guide of how to implement this functionality:
1. The Scenario
2. Generating the reusable template
3. Create T4 template for each Model Diagram
4. Use a “Meta”-Template to generate templates
Let’s start with a new Visual Studio project that contains two tangible ClassDiagrams that should contribute to the same data model, each one containing a single class:
Add a new reusable T4 template to the project that will contain the template code transforming a ClassDiagram into data classes for the data model. Name this reusable template “Transformation.ttinclude”.
Since this template is going to be used from several other templates in order to achieve the same functionality, we are going to place as much code in here as possible. This avoids the need of maintaining lots of T4 templates – one for each ClassDiagram.
Add the necessary template directives to the reusable template like, output file extension, imports and assembly references:
<#@ IntelliSenseLanguage processor="tangibleT4Editor" language="C#" #>
<#@ output extension=".cs" #>
<#@ assembly name="tangible.Modelling.ClassDiagrams.Dsl.10.dll" #>
<#@ assemblyForIntellisenseOnly processor="tangibleT4Editor" name="System.Core" #>
<#@ import namespace="tangible.Modelling.ClassDiagrams" #>
To enable calling this template from within another T4 template the transformation logic needs to be put into a method inside a static CodeBlock of this .ttinclude. This method uses a parameter to gain access to the ClassDiagram model that needs to be transformed. Each T4 template will pass its referenced ClassDiagram here.
<#+
void ProcessModel(ModelRoot modelRoot)
{
// create namespaces, classes, methods etc. here
foreach(ModelType type in modelRoot.Types)
{
#> public class <#= type.Name #> { }
<#+ }
}
#>
In this example we’re only rendering a C# class with the proper model name and skip Properties or Methods. You can find a sample template generating complete data classes from a ClassDiagram in our template Gallery.
Now we need a T4 template for each .tacls file in our solution that calls the ProcessTemplate method for its ClassDiagram. Of course you can use dependent templates that are transformed each time you save changes to the ClassDiagram (see http://t4-editor.tangible-engineering.com/blog/dependent-t4-templates.html). We are going to use standalone templates here.
Add a new Blank T4 Template to your solution for each ClassDiagram you would like to use. Here in the sample, we need two templates (ClassDiagram1.tt and ClassDiagram2.tt). Inside the template, use a <#@ include #> directive to reference the “Transformation.ttinclude” and a <#@ TangibleClassDiagram #> directive to reference the appropriate diagram file. Then call the ProcessModel() method for that ClassDiagram.
Here is what the template for ClassDiagram1 looks like:
<#@ template
inherits="Microsoft.VisualStudio.TextTemplating.VSHost.ModelingTextTransformation"
debug="true" hostSpecific="true" #>
<#@ TangibleClassDiagram processor="TangibleClassDiagramDirectiveProcessor"
provides="ModelRoot" requires="fileName='.\ClassDiagram1.tacls'" #>
<#@ include file=".\Transformation.ttinclude" #>
<#
ProcessModel(this.ModelRoot);
#>
In our example this Template would generate a file named “ClassDiagram1.cs” containing the following code:
public class ModelClass1 { }
Add another Blank T4 Template to the project containing the same T4 code snippet but change the file name to “ClassDiagram2.tacls” for the second ClassDiagram.
We could stop right at this point, but maintaining a T4 template for each CodeModel still seems a bit unhandy, so let’s do another step. How about a template that generates everything we need for each ClassDiagram file we would like? Here is what you need:
Add the reusable Template “Template FileManager V2.1” from the category “tangible > includes” of the template gallery to your solution.
Then add a Blank T4 Template to your solution and name it “ModelGenerator.tt”. Let this template generate a text file (extension .txt) and reference the template filemanager. Inside this template, create a list of ClassModel files you would like to generate everything for:
<#@ template debug="true" hostSpecific="true" #>
<#@ output extension=".txt" #>
<#@ Assembly Name="System.Core" #>
<#@ import namespace="System" #>
<#@ import namespace="System.Linq" #>
<#@ import namespace="System.Collections" #>
<#@ import namespace="System.Collections.Generic" #>
<#@ include file=".\TemplateFileManagerV2.1.ttinclude" #>
<#
var modelFiles = new List<string>()
{
"ClassDiagram1.tacls",
"ClassDiagram2.tacls"
};
#>
Now use the FileManager to let the T4 template generate a new output file (which will be a T4 template) for each ClassDiagram. For each output file write the content of a T4 template of step 3 but replace the file name properly.
You should remove the files “ClassDiagram1.tt” and “ClassDiagram2.tt” we created in step 3 now in order to avoid conflicts…
Continue the “ModelGenerator.tt” like this:
<#
TemplateFileManager manager = TemplateFileManager.Create(this);
foreach(var file in modelFiles)
{
// create a new output file
manager.StartNewFile(file.Split('.')[0] + ".tt");
// write content to output file but replace the proper file name
#>
\<#@ template
inherits="Microsoft.VisualStudio.TextTemplating.VSHost.ModelingTextTransformation"
debug="true" hostSpecific="true" \#>
\<#@ TangibleClassDiagram processor="TangibleClassDiagramDirectiveProcessor"
provides="ModelRoot" requires="fileName='.\\<#= file #>'" \#>
\<#@ include file=".\Transformation.ttinclude" \#>
\<#
ProcessModel(this.ModelRoot);
\#>
<# }
manager.Process();
#>
Saving this file will create two output files beneath “ModelGenerator.tt” in the Solution Explorer: “ClassDiagram1.tt” and “ClassDiagram2.tt” each one referencing the proper ClassDiagram file “ClassDiagram1.tacls” and “ClassDiagram2.tacls” respectively. When those templates are saved, they are automatically transformed and the C# code is being generated into “ClassDiagram1.cs” and “ClassDiagram2.cs” – neat, isn’t it?
This is what the Solution finally should look like:
The new installer routine for our tangible T4 Editor version 2.2.0 gave us a hard fight this time. But finally we could publish the setup files to our download website and to the Visual Studio Gallery on Friday.
Many parts of both the T4 Editor and the modeling tools have been improved taking all of our customers’ feedback into account. Besides several performance and memory optimizations these are the most outstanding new features and improvements:
For a more detailed list on bug fixes and new features see the release announcement in our forums.
Experience T4 text templating and code generation with the newest member of the Visual Studio family: Version 2.2.0 of our T4 Editor already fully integrates into the new Preview version of the upcoming Visual Studio 2013. Of course, the modeling tools can be used in VS2013 as well so you can stay up to date and move all your existing T4 projects to Visual Studio 2103 Preview.
Get tangible’s T4 Editor 2.2.0 and modeling tools for Visual Studio 2013 from our download page.
We are ready for the final version of Visual Studio 2013 – are you?
With version 2.2.0 comes a new – and still completely free – online template gallery. Benefit from sharing templates:
There are lots of developers out there who might be facing the same problems as you do, or may already have solved it. Have a look at our free online gallery and check out if there is a template online that might help in your case.
For example: tangible engineering provides templates for Visual Studio interoperability like accessing solutions, projects and code elements within your solution, managing referenced assemblies and configuration files from within T4 templates. There are also exemplary templates for using our modeling tools like generating EntityFramework classes from our persistence model and many more…
The new gallery melts into any Visual Studio version like a charm. You can simply drag files from the gallery into your solution explorer or download ready-to-use templates with all related include files with one click! Or drop any file into your T4 editor window in order to either add template directives or search for matching online templates for that file.
Hint:
You can download any template from our gallery without the need of signing up. But if we can encourage you to share your templates, too, sign up to our forums and upload templates in the gallery with the same account…
In our last version, all modeling diagrams gained the capabilities of extensible properties that allowed you to add custom data to any item in a diagram. These properties can be accessed from within T4 templates processing that diagram. But what if a diagram does not provide all extensible properties that are necessary? So far, the code generation simply failed.
But version 2.2.0 now allows you to create non-existing extensible properties inside a diagram while processing it: Call the EnsureExtensiblePropertyDefined method and create needed properties and default values while processing the model.
Do you need assistance for any of the T4 template directives? Or an example of how to use the <#@ assemblyForIntellisenseOnly processor="tangibleT4Editor" #> directive?
Help now is only a single keystroke away: move your cursor into the directive and hit F1 as you are used to for any keyword or .NET Framework class etc. in your code editor. You are instantly taken to either the matching MSDN page for standard T4 directives or our online documentation on tangible’s T4 directives.
We are also eager to hear from you about this new version of tangible’s T4 editor and modeling tools. Please feel free to post any opinion, suggestion or question to the discussion pages on VisualStudioGallery or start a new thread in our forums. You might also write an email to support@tangible.de.
]]>
Sometimes the output code generated by a T4 template uses imports from an assembly that has not been referenced by the containing Visual Studio project yet. So on the first build attempt the user receives corresponding compile errors and has to add the references manually.
So why not enable the template to add necessary references to the project while generating the output code?
In order to gain access to the Visual Studio project we use classes from the Visual Studio automation classes. This requires the T4 template to reference the EnvDTE.dll and the VsLangProj.dll. Add the following directives to the header of your template:
<#@ assembly name="EnvDTE" #>
<#@ assembly name="VSLangProj" #>
Then we need a reference to the current instance of Visual Studio:
<#
var studio = (this.Host as IServiceProvider).GetService(typeof(EnvDTE.DTE))
as EnvDTE.DTE;
#>
From here we can get the current project object by finding the ProjectItem of the template and accessing its containing project:
<#
var templateItem = studio.Solution.FindProjectItem(this.Host.TemplateFile);
var project = templateItem.ContainingProject;
#>
Unfortunately this project object does not allow to access the assembly references of the project. We need to get a VSProject version of the project:
<#
var vsProject = project.Object as VSLangProj.VSProject;
#>
This object finally allows us to access a collection containing all assembly references of that project.
We can add new references via the full path of a .dll, the name of another project in the solution or assembly names.
<#
vsProject.References.Add(@“C:\SomePath\MyLibrary.dll”);
vsProject.References.Add(“System.Data.Entity”);
vsProject.References.Add(“System.Configuration, Version=2.0.0.0, Culture=neutral, PublicKeyToken=B03F5F7F11D50A3A”);
#>
If a reference to that assembly already exists, there will no exception but the statement is ignored.
Now transform the template and see that all desired references have been added to the current project.
A reusable .ttinclude-File that encapsulates the logic of how to add references to a Visual Studio Project is available in the tangible T4 Editor Template Gallery.
]]>
In most scenarios T4 template are used to transform the contents of a given file into a different format (C# code, XML, …). That way the T4 template file becomes dependent on the input file. The usual workflow then is: edit the input file, save the input file and transform the template again to make sure that all changes are transformed again.
From time to time one might simply forget to transform the template after editing the input file. That’s when it would be great to have the edit-save-generate procedure in one simple step. This is where the “Dependent Templates” feature of the tangible T4 Editor comes into play.
In the Solution Explorer right click the file you want to be the input file for a dependent T4 template and choose “Add T4 Code Generator”.
The tangible T4 Editor then will add a new T4 template attached to the previously selected input file. This template contains some sample code about how to access the input file and generate output code from it.
The attached T4 template is transformed every time you edit and save the input file.
The “Dependent Templates” feature is only available in the Pro-Version of tangible T4 Editor. You can buy the Pro-Version here.
]]>It is common to use Reflection to explore namespaces, types and classes when running in a .NET application. But T4 Templates generate output code during Design Time. So there are no compiled assemblies yet that could be reflected or that ones available are from the last build and outdated.
In order to get information on what classes will be available in your assembly to be used inside a T4 Template, you need to access the Visual Studio CodeModel of the current project that is available at Design Time.
Using the Visual Studio Code Model you can access the following artifacts of your code at Design Time:
Types, Namespaces, Structures, Interfaces, Classes, Enumerations, Variables, Delegates, Properties and Functions. These Artifacts can be accessed via the CodeModel-Property of a EnvDTE.Project class or the Property “FileCodeModel” of a EnvDTE.ProjectItem.
The next steps show you, what template directives are necessary to access the CodeModel, how to get all namespaces inside a Visual Studio Project and how to browse those namespaces.
To get access to the Visual Studio Automation Model you need to add a reference to the EnvDTE.dll. So add the following line to the existing template directives:
<#@ assembly name="EnvDte" #>
Now you can access the running instance of Visual Studio using the template Host as a ServiceProvider and receive the current Project via the fileName of the T4 template file:
<#
var visualStudio = (this.Host as IServiceProvider).GetService(typeof(EnvDTE.DTE))
as EnvDTE.DTE;
var project = visualStudio.Solution.FindProjectItem(this.Host.TemplateFile)
.ContainingProject as EnvDTE.Project;
#>
From here on it would be straight forward to iterate the project.CodeModel collection of CodeElements to find all internal and external namespaces used in that project. But here is a known Visual Studio bug: All namespaces retrieved by the project.CodeModel collection are marked as external. This prevents us from isolating all namespaces within the project.
That’s why we need to use the FileCodeModel as a workaround instead, which is significantly slower than the CodeModel.
We need to recursively get all project items of the project and use their file code model to get the project’s namespaces. (Please note, that the Method GetProjectItemsRecursively(…) resides inside a <#+ #> class code block you should position at the end of your template file)
<#+
public List<EnvDTE.ProjectItem> GetProjectItemsRecursively(EnvDTE.ProjectItems items)
{
var ret = new List<EnvDTE.ProjectItem>();
if (items == null) return ret;
foreach(EnvDTE.ProjectItem item in items)
{
ret.Add(item);
ret.AddRange(GetProjectItemsRecursively(item.ProjectItems);
}
return ret;
}
#>
Now call that method in the template code and find all namespaces inside the project items’ FileCodeModel:
<#
var namespaces = new List<string>();
foreach(EnvDTE.ProjectItem item in GetProjectItemsRecursively(project))
{
if (item.FileCodeModel == null) continue;
foreach(EnvDTE.CodeElement elem in item.FileCodeModel.Elements)
{
if (elem.Kind == EnvDTE.vsCMElement.vsCMElementNamespace
&& !namespaces.Contains(elem.FullName))
namespaces.Add(elem.FullName);
}
}
#>
Now that we know what namespaces have been defined inside the project, we can use the project’s CodeModel to find those namespaces there:
<#
var codeNamesapces = project.CodeModel.CodeElements
.OfType<EnvDTE.CodeNamespace>()
.Where(cn => namespaces.Contains(cn.FullName);
#>
In order to find Artifacts inside the codeNamespaces, use the Members-Property. In all other cases use the Children-Property.
The following code snippet generates a list of all class names in all Namespaces of the current project:
<#
foreach(EnvDTE.CodeNamespace ns in codeNamespaces)
{
foreach(EnvDTE.CodeClass cc in ns.Members.OfType<EnvDTE.CodeClass>())
{
#><#= cc.FullName #>
<# }
}
#>
There is a full sample available for download from our T4 Template Gallery. This template walks all CodeElements in the Visual Studio Solution and displays them hierarchically in a Html TreeView just like the Visual Studio Object Browser.
Christian Weyer shows in his blog an application of using the Code Model and generates WCF operation contract signatures:
]]>This is the last part of the blog series about some of tangible engineering’s contributions to a Model Driven Development process in software development. In this part we are going to create a basic generic user interface that allows users to explore and manipulate data from any domain specific model created as a Persistent Object Model.
The user interface is created based on the .tasl model created in Part 2 of this series and grants access to a SQL Server database built upon the EntityFramework code classes of Part 3 and 4.
Part 1: Model Driven Development and Series Overview
Part 2: Create a Persistence Model using Tangible Modeling Tools
Part 3: Generating Domain Specific data objects using T4 and EntityFramework 5 CodeFirst
Part 4: Data Persistence and Versioning
Part 5: Generate a Basic UI using T4 and Windows Presentation Foundation
The resulting basic User Interface
This is what the basic user interface created in this blog post is going to look like at the end. After having finished this post we’re going to have a WPF window containing a TabPanel for each Persistent Object of the domain specific model. Inside this tab there will be a list of all instances of that Persistent Object existing in the database. Next to that list there will be a detail view displaying all properties of the selected Persistent Object instance.
The User will be able to edit the properties of the Persistent Objects, Add new ones and delete existing ones. And of course the user will be able to create relationships between instances.
Prior to generating WPF markup and logic for the user interface, we need to make two slight adjustments to the T4 template that generates the EntityFramework code classes (named TaslToCodeFirst.tt in Part 3): We need the template to generate partial data classes and mark collection properties as “virtual”.
The code classes generated by the TaslToCodeFirst.tt should be partial classes so we can override the ToString() method in a non-generated codefile in order to get a better visual representation for the generated objects and not to lose those changes upon regeneration of the template.
Change the following line inside the T4 template
#> public class <#= persistentObject.Name #> : System.ComponentModel.INotifyPropertyChanged
to
#> public partial class <#= persistentObject.Name #>
: System.ComponentModel.INotifyPropertyChanged
The second change is as easily applied as the first one. Collection properties need to be marked as “virtual” so that proxy-classes generated by the EntityFramework may recognize them as navigation properties:
Change
public ObservableCollection<<#= relation.Source.Name #>> <#= relation.SourceRoleName #>
to
public virtual ObservableCollection<<#= relation.Source.Name #>>
<#= relation.SourceRoleName #>
and
public ObservableCollection<<#= relation.Target.Name #>> <#= relation.TargetRoleName #>
to
public virtual ObservableCollection<<#= relation.Target.Name #>>
<#= relation.TargetRoleName #>
To be able to display persistent object nicely in the user interface, we’re going to override the ToString() methods for each generated code class. Add a new C# code file to the project and insert the following lines of code:
partial class Bank
{
public override string ToString()
{
return this.Name;
}
}
partial class Customer
{
public override string ToString()
{
return this.LastName + ", " + this.FirstName;
}
}
partial class Account
{
public override string ToString()
{
return this.AccountNo;
}
}
partial class CashCard
{
public override string ToString()
{
return this.Id + " (exp: " + this.Expiration.ToString("MM/yyyy") + ")";
}
}
For creating the user interface, we need two T4 templates. One to create the XAML markup for the WPF window and the second one to create the CodeBehind class. Additionally we need to adapt the App.xaml to use the generated WPF window as the default window.
Create a new blank T4 Template in your solution and name it “TaslToWPF.tt”. Use the same header directives as in the T4 template that generated the EntityFramework code classes so that the T4 template can access the .tasl model, but change the output extension to “.xaml”.
<#@ template
inherits="Microsoft.VisualStudio.TextTemplating.VSHost.ModelingTextTransformation"
debug="true"
hostSpecific="true" #>
<#@ output extension=".xaml" #>
<#@ TangiblePersistentObjectDiagram
processor="TangiblePersistentObjectDiagramDirectiveProcessor"
requires="fileName='BlogSeries.tasl'"
provides="PersistentObjectModel" #>
<#@ assembly name="tasl.Dsl.10.dll" #>
<#@ import namespace="tasl.Dsl" #>
<#@ assembly name="System.Core.dll" #>
<#@ import namespace="System" #>
<#@ import namespace="System.Linq" #>
<#@ import namespace="System.Collections" #>
<#@ import namespace="System.Collections.Generic" #>
Create another blank T4 Template named “TaslToWPFCodeBehind.tt” with the same header directives as shown above. Change the output extension to “.cs”.
Since the “TaslToWPF.tt” Template will generate a “TaslToWPF.xaml” file containing the main window of our WPF application, we need to change the App.xaml so that it points to this window:
<Application x:Class="BlogSeriesApp.App"
xmlns="http://schemas.microsoft.com/winfx/2006/xaml/presentation"
xmlns:x="http://schemas.microsoft.com/winfx/2006/xaml"
StartupUri="TaslToWPF.xaml">
<Application.Resources>
</Application.Resources>
</Application>
In order to generate the full functionality for the basic user interface, this section is split into several parts: At first we’re just going to display any data from the database in a lists for each Persistent Object object inside a TabControl. Then we’re going to deal with adding, deleting and changing data and save changes to the database. After that we’re going to create a detail view for the selected item in a list and display navigation properties.
At the very beginning, we’re going to create the scaffold of the CodeBehind class for the XAML window. Then we’ll write the code for rendering the XAML markup.
We need a C# code class representing the main window of the basic user interface. When loading that window we’re going to create a new instance of the Context class that grants us access to the database, pass the proper connection information and set this context as the DataContext of the window.
Put the following code snippet after the template directives of the TaslToWPFCodeBehind.tt file:
<# List<PersistentObjectBase> allPersistentObjects =
this.PersistentObjectModel.PersistentObjects.ToList<PersistentObjectBase>();
allPersistentObjects.Insert(0, this.PersistentObjectModel.PersistentRootObject);
#>
using System;
using System.Windows;
using System.Windows.Controls;
using System.Data.Entity;
using System.Linq;
namespace BlogSeriesApp
{
/// <summary>
/// Interaction logic for MainWindow.xaml
/// </summary>
public partial class MainWindow : Window
{
public MainWindow()
{
InitializeComponent();
this.Loaded += MainWindow_Loaded;
}
private Context _DataContext;
void MainWindow_Loaded(object sender, RoutedEventArgs e)
{
_DataContext = new Context(
@"Server=(local)\SQLEXPRESS;Database=BankPersistenceModel;Trusted_Connection=True;");
<# foreach(var persistentObject in allPersistentObjects)
{
#> _DataContext.<#= persistentObject.Name #>.Load();
<# }
#> this.DataContext = _DataContext;
}
}
}
The following code snippet creates the XAML scaffold for the main window. Inside the window we’re going to place a TabControl containing a Tab for each Persistent Object in our model. That already might suffice, but for aesthetics we’re going to display only the scalar properties inside the grids.
<# List<PersistentObjectBase> allPersistentObjects =
this.PersistentObjectModel.PersistentObjects.ToList<PersistentObjectBase>();
allPersistentObjects.Insert(0, this.PersistentObjectModel.PersistentRootObject);
#>
<Window x:Class="BlogSeriesApp.MainWindow"
xmlns="http://schemas.microsoft.com/winfx/2006/xaml/presentation"
xmlns:x=http://schemas.microsoft.com/winfx/2006/xaml
Title="MainWindow" Height="600" Width="800">
<Window.Resources>
</Window.Resources>
<TabControl x:Name="tab">
<# // create a tab for each persisted object
foreach(var persistentObject in allPersistentObjects)
{
#> <TabItem Header="<#= persistentObject.Name #>">
<Grid>
<Grid.ColumnDefinitions>
<ColumnDefinition Width="250" />
<ColumnDefinition Width="5" />
<ColumnDefinition Width="*" />
</Grid.ColumnDefinitions>
<!-- This DataGrid will contain all <#= persistentObject.Name #> objects -->
<DataGrid x:Name="grd<#= persistentObject.Name #>"
ItemsSource="{Binding <#= persistentObject.Name #>.Local}"
AutoGenerateColumns="False">
<DataGrid.Columns>
<# // create a column foreach scalar property in the persistent object
foreach(var property in persistentObject.Properties)
{
#> <DataGridTextColumn IsReadOnly="<#= property.GetExtensiblePropertyValue("Identifier").ToString() #>"
Header="<#= property.Name #>"
Binding="{Binding <#= property.Name #>}" />
<# }
#> </DataGrid.Columns>
</DataGrid>
<!-- Detail Data here -->
</Grid>
</TabItem>
<# }
#> </TabControl>
</Window>
You might want to run the application and have a look at the objects that are already stored inside the database.
Fortunately the DataGrid element of the Windows Presentation Foundation already provides the user with the possibility to change properties of an object in its list. Adding a new object to the list is also available: The user only needs to enter information into the last (and yet empty) line. Even deleting is already possible. Select a row and hit the “Entf” button on the keyboard.
The only thing we need to implement at this point is to save that changes. Because the Persistent Objects are bound to the DataGrids all changes are already propagated to those objects.
We’re going to save changes when the user closes the window. So go to the “TaslToWPFCodeBehind.tt” and insert a listener to the “Closing” Event and hook it up in the constructor.
Add to the constructor:
this.Closing += MainWindow_Closing;
Add after the constructor:
void MainWindow_Closing(object sender, System.ComponentModel.CancelEventArgs e)
{
_DataContext.ChangeTracker.DetectChanges();
if (_DataContext.ChangeTracker.Entries().Count() > 0)
{
if (MessageBox.Show("Save changes?", "Question", MessageBoxButton.YesNo)
== MessageBoxResult.Yes)
{
try
{
_DataContext.SaveChanges();
}
catch (Exception ex)
{
MessageBox.Show("Error saving changes: " + ex.Message);
e.Cancel = true;
}
}
}
}
Now that we have a list for each Persistent Object in our domain specific model, let’s put a detailed view next to that displays all scalar properties of the selected item in the list. Later we’re going to add navigational properties to this detail view. Add the following part to the TaslToWPF.tt where it says “Detail Data here”:
<!-- This border contains the details-view for <#= persistentObject.Name #> objects -->
<Border BorderBrush="DarkGray" Grid.Column="2" Margin="5">
<Grid DataContext="{Binding ElementName=grd<#= persistentObject.Name #>,
Path=SelectedItem}">
<Grid.ColumnDefinitions>
<ColumnDefinition Width="Auto" />
<ColumnDefinition Width="5" />
<ColumnDefinition Width="*" />
<ColumnDefinition Width="5" />
<ColumnDefinition Width="25" />
</Grid.ColumnDefinitions>
<Grid.RowDefinitions>
<# // create a row definition (and a spacer) for each
// - scalar property
// - navigation property where this item is target
// - navigation property where this item is source
int propertyCount = persistentObject.Properties.Count;
int targetRelationCount = persistentObject.Targets.TargetDomainRole.GetElementLinks(persistentObject).Count;
int sourceRelationCount = persistentObject.Sources.TargetDomainRole.GetElementLinks(persistentObject).Count;
for (int i = 0; i < propertyCount + targetRelationCount + sourceRelationCount; i++)
{
#> <RowDefinition Height="Auto" />
<RowDefinition Height="5" />
<# }
#> </Grid.RowDefinitions>
<# // iterate all scalar properties
// (not in a foreach loop, because this way we can easier decide in
// which row the ui elements go)
for(int i = 0; i < propertyCount; i++)
{
var property = persistentObject.Properties.ElementAt(i);
#> <TextBlock Text="<#= property.Name #>:"
Grid.Row="<#= (2 * i).ToString() #>"
Grid.Column="0"
Margin="0,3,5,0"
VerticalAlignment="Top" />
<TextBox Text="{Binding <#= property.Name #>}"
Grid.Row="<#= (2 * i).ToString() #>"
Grid.Column="2" />
<# }
// Navigation Properties here
#> </Grid>
</Border>
This is the result so far including the Detail view:
Now that we can display and edit the scalar properties of a selected object, we also want to manipulate navigation properties and the related objects. For example, if we’re displaying a bank, we want to see all customers of this bank and even want to add new customers to that bank or remove some of them.
Again this can be done inside the XAML part. Like we did in the T4 Template that generated the C# code classes, we need to take care of relations where the current object is either the source or the target of the relation. So add the following code where the “TaslToWPF.tt” says “Navigation Properties here.”
// iterate all navigation properties where this item is target
var targetRelations = persistentObject.Targets.TargetDomainRole
.GetElementLinks(persistentObject);
for(int i = propertyCount; i < propertyCount + targetRelationCount; i++)
{
var relation = targetRelations.ElementAt(i - propertyCount)
as tasl.Dsl.PersistentRelation;
if (relation.Target.Name == persistentObject.Name)
{
#> <TextBlock Text="<#= relation.SourceRoleName #>:"
Grid.Row="<#= (2 * i).ToString() #>"
Grid.Column="0"
Margin="0,3,5,0"
VerticalAlignment="Top" />
<# // if its a scalar property only display its value
// otherwise create a grid showing all child objects
// participating in this relation
if (relation.SourceMultiplicity == tasl.Dsl.Multiplicity.ZeroMany)
{
#> <DataGrid x:Name="grd<#= relation.Source.Name #>In<#= relation.Target.Name #>As<#= relation.SourceRoleName #>"
Grid.Row="<#= (2 * i).ToString() #>"
Grid.Column="2"
AutoGenerateColumns="False"
Height="150"
ItemsSource="{Binding <#= relation.SourceRoleName #>}">
<DataGrid.Columns>
<# foreach(var property in relation.Source.Properties)
{
#> <DataGridTextColumn IsReadOnly="<#= property.GetExtensiblePropertyValue("Identifier").ToString() #>"
Header="<#= property.Name #>"
Binding="{Binding <#= property.Name #>}" />
<# }
#> </DataGrid.Columns>
</DataGrid>
<# }
else
{
#> <TextBlock Text="{Binding <#= relation.SourceRoleName #>}"
Grid.Row="<#= (2 * i).ToString() #>"
Grid.Column="2" />
<# }
}
}
// iterate all navigation properties where this item is source
var sourceRelations = persistentObject.Sources.TargetDomainRole
.GetElementLinks(persistentObject);
for(int i = propertyCount + targetRelationCount; i < propertyCount + targetRelationCount + sourceRelationCount; i++)
{
var relation = sourceRelations.ElementAt(i - propertyCount - targetRelationCount) as tasl.Dsl.PersistentRelation;
if (relation.Source.Name == persistentObject.Name)
{
#> <TextBlock Text="<#= relation.TargetRoleName #>:"
Grid.Row="<#= (2 * i).ToString() #>"
Grid.Column="0"
Margin="0,3,5,0"
VerticalAlignment="Top" />
<# // if its a scalar property only display its value
// otherwise create a grid showing all child objects
// participating in this relation
if (relation.TargetMultiplicity == tasl.Dsl.Multiplicity.ZeroMany)
{
#> <DataGrid x:Name="grd<#= relation.Target.Name #>In<#= relation.Source.Name #>As<#= relation.TargetRoleName #>"
Grid.Row="<#= (2 * i).ToString() #>"
Grid.Column="2"
AutoGenerateColumns="False"
Height="150"
ItemsSource="{Binding <#= relation.TargetRoleName #>}">
<DataGrid.Columns>
<# foreach(var property in relation.Target.Properties)
{
#> <DataGridTextColumn IsReadOnly="<#= property.GetExtensiblePropertyValue("Identifier").ToString() #>"
Header="<#= property.Name #>"
Binding="{Binding <#= property.Name #>}" />
<# }
#> </DataGrid.Columns>
</DataGrid>
<# }
else
{
#> <TextBlock Text="{Binding <#= relation.TargetRoleName #>}"
Grid.Row="<#= (2 * i).ToString() #>"
Grid.Column="2" />
<# }
}
In this part of the blog series we created two T4 templates that generate a WPF window and a matching code behind class based on a domain specific Persistent Object Model. We used these templates to generate a basic user interface for the .tasl Model we created in Part 2 of this series. The user interface uses also the Entity Framework code classes generated in Part 3 to display data from a database persistence layer introduced in Part 4 of this blog series.
If you have read this blog series and are curios to get your hands on parts it, here is what you need:
This part of the Model Driven Development blog series creates persistence layer (based on SQL Server) for the domain specific model built in Part 2 of the series using the C# code classes for Entity Framework 5.0 generated by a T4 template in Part 3.
The next blog post will create a basic user interface for interacting with the data objects and storing them in a SQL Server relational database.
Part 1: Model Driven Development and Series Overview
Part 2: Create a Persistence Model using Tangible Modeling Tools
Part 3: Generating Domain Specific data objects using T4 and EntityFramework 5 CodeFirst
Part 4: Data Persistence and Versioning
Part 5: Generate a Basic UI using T4 and Windows Presentation Foundation
Create SQL Server Database for Domain Specific Model
First, make sure you have access to a SQL Server installation. You can download the SQL Server Express Edition for free here.
Then you need to get a connection string that lets the data context know where to create the database and to access data from our domain specific model. Using a SQL Server Express instance installed on your local computer that connection string might look like this:
“Server=(local)\SQLEXPRESS;Database=BankPersistenceModel;Trusted_Connection=True;”
If you need assistance in what your connection string should look like – look at http://connectionstrings.com/
As an example we’re going to use a Console Application that either contains our domain specific model file (.tasl) and the T4 template that generates the Entity Framework CodeFirst classes or references the assembly that does contain both.
So at the application startup the Entity Framework needs to know how to initialize the database for our domain model. At this moment we want to assure that the database is created when we intend to access it. For this purpose there is an existing Initializer class: System.Data.Entity.CreateDatabaseIfNotExists<T>, where T needs to be replaced by the Type of our Database Context class.
using System.Data.Entity;
public static class Program
{
public static void Main(string[] args)
{
System.Data.Entity.Database.SetInitializer<Context>(
new CreateDatabaseIfNotExists<Context>());
// access data here
}
}
Now we can create an instance of the Context class generated by our T4 template we built in the last blog post. We can pass the connection string to our database in the constructor of the Context class. Since the Context class implements IDisposable, it should be used inside using-blocks:
using (var ctx = new Context(
@"Server=(local)\SQLEXPRESS;Database=BankPersistenceModel;Trusted_Connection=True;"))
{
// read and write data here
}
Of course the database will be empty on the first call, so let’s start with writing data: We’re going to create two instances of the Bank class, add them to the context and save them in the database:
using (var ctx = new Context(
@"Server=(local)\SQLEXPRESS;Database=BankPersistenceModel;Trusted_Connection=True;"))
{
var bank1 = new Bank() { Name = "Goliath National Bank" };
ctx.Bank.Add(bank1);
var bank2 = new Bank() { Name = "ACME Bank" };
ctx.Bank.Add(bank2);
ctx.SaveChanges();
}
You don’t need to care about setting the Id-Property. We marked that property as the [Key] identifier in the database, so its set automatically and correctly.
If you open the SQL Server Express Management Studio you can have a look inside the database and its tables:
Now let’s add another bank and give it a customer, so that you get a feeling for how creating relationships between objects works:
using (var ctx = new Context(
@"Server=(local)\SQLEXPRESS;Database=BankPersistenceModel;Trusted_Connection=True;"))
{
// create a bank
var bank3 = new Bank() { Name = "Awesome Bank" };
ctx.Bank.Add(bank3);
// create a customer and add it to the bank's customers collection
var customer1 = new Customer() { FirstName = "Joe", LastName = "Public" };
bank3.Customers.Add(customer1);
ctx.SaveChanges();
}
After having written some data, here’s how to retrieve data from the database. We’re going to iterate all banks and write their names to the Console output:
using (var ctx = new Context(
@"Server=(local)\SQLEXPRESS;Database=BankPersistenceModel;Trusted_Connection=True;"))
{
foreach (var bank in ctx.Bank)
Console.WriteLine(bank.Name);
}
Its getting more interesting when we attempt to change the domain specific model after having created the database and filled it with lots of data. Should we now export the data, create a new database and enter all data again? Should we change the database schema manually?
Its easier than one might think. Entity Framework comes with more database initializers than only the CreateDatabaseIfNotExists initializer and there is one that supports schema evolution in the database and thus provides database migration for us. There are just a few more lines of code necessary to make the migration feature work.
First we need to create a new class that determines what database is to be migrated and how the migration process is parameterized. So create a new class called MigrationConfiguration and derive it from DbMirgrationConfiguration<Context>. In the constructor we decide what database to use and if migration is allowed.
sealed class MigrationConfiguration :
System.Data.Entity.Migrations.DbMigrationsConfiguration<Context>
{
public MigrationConfiguration()
{
this.AutomaticMigrationsEnabled = true;
//this.AutomaticMigrationDataLossAllowed = true;
this.TargetDatabase = new System.Data.Entity.Infrastructure.DbConnectionInfo(
@"Server=(local)\SQLEXPRESS;Database=BankPersistenceModel;Trusted_Connection=True",
"System.Data.SqlClient");
}
}
Be careful: changing the domain specific model might come with potential data loss e.g. if you delete a property of a Persistent Object. The migration initializer will notice this and throw an exception unless you set the “AutomaticMigrationDataLossAllowed” property to “true” (see comment in code snippet above).
Use the MigrateDatabaseToLatestVersion<T, U> class instead of the CreateDatabaseIfNotExists initializer:
System.Data.Entity.Database.SetInitializer<Context>(
new System.Data.Entity.MigrateDatabaseToLatestVersion<Context, MigrationConfiguration>());
Now go ahead and for example add a new property to the Persistent Object “Customer” (e.g. an address property of type string), save the changes and transform the TaslToCodeFirst.tt again. Then run the program again and have a look inside the database where an additional column will be created.
To show you that you’re not restricted to use Microsoft’s SQL Server only, here is how one would approach using a MySQL Server as a persistence layer.
Download and install MySQL 6.6.4 for .NET which is compatible to the EntityFramework and supports migration database initializers.
Add the MySQL Data Provider Factory to the configuration of your appliction (e.g. app.config):
<system.data>
<DbProviderFactories>
<add name=”MySQL DataProvider”
invariant=”MySql.Data.MySqlClient”
description=”.NET Data Provider for MySQL”
type=”MySql.Data.MySqlClient.MySqlClientFactory,MySql.Data” />
</DbProviderFactories>
</system.data>
Use a proper connection string for the MySql database to create the Context class with and also in the MigrationConfiguration class.
In the next (and last) part of the blog series on tangible engineering’s support for Model Driven Development we are going to create another T4 template. This template will create a basic user interface based on the domain specific model from the second part of this blog series using the Entity Framework code classes and the SQL Server persistence layer to display and manipulate data.
]]>Following to this blog post we’re going to create data persistence layer based on this data classes and a basic user interface using another T4 template.
Part 1: Model Driven Development and Series Overview
Part 2: Create a Persistence Model using Tangible Modeling Tools
Part 3: Generating Domain Specific data objects using T4 and EntityFramework 5 CodeFirst
Part 4: Data Persistence and Versioning
Part 5: Generate a Basic UI using T4 and Windows Presentation Foundation
The Entity Framework CodeFirst model
Create a T4 template for data classes
The ADO.NET Entity Framework is Microsoft’s open source O/R-Mapping technology, relieving the developer from caring about how data is stored in a relational database. Thus developers can focus on creating data-oriented applications by their well-known concepts of domain specific data objects.
Usually the Entity Framework is used in a ModelFirst approach in which the domain specific model is created using a visual entity model designer or derived from an existing database scheme. Based on this model code classes are generated that the developer can use to display data in the user interface.
Unfortunately the code generated by the entity model designer cannot easily be adapted to match the developer’s needs – for example if the developer wants the code classes to use a special collection type to be used when creating associations between two data classes.
That is where the CodeFirst approach fits in. In contrast to ModelFirst the developer writes the code classes manually and then creates the database from those classes. That way the developer is free to implement the code classes as needed.
When writing code classes manually the developer needs to repeat writing the same code fragments over and over again. And if there’s something to be changed later on, every existing line of code every existing line of code needs to be revised.
This is where we employ code generation again: Using a tangible Persistent Object Diagram as an input file with a customized T4 template, we automatically generate CodeFirst code classes that define that database structure later on. The same code classes are used to display data information in the user interface.
This results in three advantages: First, we’re using a model based approach, which eases the communication between stakeholders using a visual representation and is easy to adapt. Second, we’re using CodeFirst code classes, which is comfortable for developers, and third, we’re using code generation, allowing changes to be easily applied to the existing code model.
T4 stands for “Text Template Transformation Toolkit” and is a text generation framework that comes with Visual Studio. This toolkit allows the generation of any text format like C#, XML, HTML, etc. structured by code written in C# or VB. Unfortunately there is no editing experience included in Visual Studio, but text transformation is fully supported. Our tangible T4 Editor extends this functionality so you can comfortably edit T4 files with syntax highlighting, auto completion and IntelliSense.
In our model driven scenario we’re going to use the Persistent Object Model (the .tasl file we generated in the last part) as an input for a T4 template. Although the .tasl file is an XML based file and we could open and iterate it with an XML parser, we’re going to use another feature of tangible’s T4 Editor, that allows us to access the Persistent Object Model via code classes inside the T4.
This section provides you with a step-by-step manual how to create a T4 template transforming a tangible Persistent Object Model into Entity Framework CodeFirst code classes. But first we’re going to look at, what the expected code result should look like.
As a reminder: this is the domain specific model we are going to transform into C# code classes:
In order to use the Entity Framework as an O/R-Mapper accessing a given database, we need a so called “Context” class that knows how to map code classes to database tables and columns. We create a C# class for it, inheriting from System.Data.Entity.DbContext that contains a DbSet for every persistent object modeled in the .tasl file.
public class Context : System.Data.Entity.DbContext
{
public Context(string connectionString) : base(connectionString) { }
public DbSet<Bank> Banks { get; set; }
public DbSet<Customer> Customers { get; set; }
public DbSet<Account> Accounts { get; set; }
public DbSet<CashCard> CashCards { get; set; }
}
And then we need to create a C# class for each Persistent Object that we want to use in the user interface and manipulate data with. This is the expected code for the CashCard object as a UI bindable C# class:
public class CashCard : System.ComponentModel.INotifyPropertyChanged
{
private int _Id;
[System.ComponentModel.DataAnnotations.Key]
public int Id
{
get { return _Id; }
set { _Id = value; OnPropertyChanged("Id"); }
}
private System.DateTime _Expiration;
public System.DateTime Expiration
{
get { return _Expiration; }
set { _Expiration = value; OnPropertyChanged("Expiration"); }
}
private string _PIN;
public string PIN
{
get { return _PIN; }
set { _PIN = value; OnPropertyChanged("PIN"); }
}
protected void OnPropertyChanged(string propertyName)
{
if (this.PropertyChanged != null)
this.PropertyChanged(this,
new System.ComponentModel.PropertyChangedEventArgs(propertyName));
}
public event System.ComponentModel.PropertyChangedEventHandler PropertyChanged;
}
At this point you already can see how painful it will be, if one created a large amount of data classes by hand and afterwards noticed that e.g. the implementation of INotifyPropertyChanged was missing…
That’s why we’re going to use the functionality of T4 to generate the code classes. That means: if there is to fix something later, we only need to fix it in the template and all the code gets automatically repaired.
Before we can start to build the T4 template, we need to add the Entity Framework libraries in version 5 to our project. Inside Visual Studio Menu click “Tools” > “Library Pack Manager” > “Package Manager Console” and type “Install-Package EntityFramework” into the package manager console window.
Right click your current project in the Solution Explorer and choose “Add” > “New Item”. Select a “Blank T4 Template” from the “tangible T4 Editor” category. Name it “TaslToCodeFirst.tt” and make sure it is placed beside your .tt file in the project.
Open the T4 template file in the tangible T4 Editor by double clicking its name in the Solution Explorer window and remove all existing lines.
Add a template directive that makes this T4 template inherit from ModelingTextTransformation and a TangiblePersistentObjectDiagram directive. This will allow you to access the Persistent Object Model by classes and properties inside the T4 template with auto completion and IntelliSense as you’re used to by Visual Studio. Provide the directive with the “BlogSeries.tasl” filename to our model file.
Set the output extension to “.cs” and import necessary namespaces and assemblies.
Your template should similar to this:
<#@ template
inherits="Microsoft.VisualStudio.TextTemplating.VSHost.ModelingTextTransformation"
debug="true"
hostSpecific="true" #>
<#@ output extension=".cs" #>
<#@ TangiblePersistentObjectDiagram
processor="TangiblePersistentObjectDiagramDirectiveProcessor"
requires="fileName='BlogSeries.tasl'"
provides="PersistentObjectModel" #>
<#@ assembly name="System.Core.dll" #>
<#@ assembly name="tasl.Dsl.10.dll" #>
<#@ import namespace="tasl.Dsl" #>
<#@ import namespace="System" #>
<#@ import namespace="System.Linq" #>
<#@ import namespace="System.Collections" #>
<#@ import namespace="System.Collections.Generic" #>
Now we’re going to create template code that outputs c# code for the DbContext class
C# code inside <# … #> tags will be executed when the template is transformed. Text outside those tags (with white background color) will be written at the current position in the output file. Expressions inside <#= … #> tags will be evaluated and the result will be written in the output file.
So first we’re going to write the class definition, that will be simply copied into the output file. But inside the class definition we’re using a foreach loop iterating over all persistent objects and write the DbSet property for the persistent object.
Put the following code directly after the template header:
using System;
using System.Data.Entity;
using System.ComponentModel;
using System.Collections.ObjectModel;
public class Context : DbContext
{
public Context(string connectionString) : base(connectionString) { }
<# // create a list containing all persistent objects and the persistent root object
List<PersistentObjectBase> allPersistentObjects =
this.PersistentObjectModel.PersistentObjects.ToList<PersistentObjectBase>();
allPersistentObjects.Add(this.PersistentObjectModel.PersistentRootObject);
// iterate all persistent objects and create a DbSet property for it
foreach(var persistentObject in allPersistentObjects)
{
#> public DbSet<<#= persistentObject.Name #>> <#= persistentObject.Name #> { get; set; }
<# }
#>
}
If you transform the template so far, you’ll see that the result matches our desired output for the Context class mentioned above.
Now it’s getting a bit more complicated, because for the data classes we need to iterate all classes again, then create all scalar properties, all associations between the classes and the INotifyPropertyChanged interface.
So first let’s create the class stubs for the persistent object and then later extend the code.
<# foreach(var persistentObject in allPersistentObjects)
{
#> public class <#= persistentObject.Name #> : INotifyPropertyChanged
{
// 1: create scalar properties
// 2: create associations
// 3: implement INotifyPropertyChanged
}
<# }
#>
Implementing INotifyPropertyChanged is straight forward since there is no template logic necessary. Place the following code where the previous code snippet says “// 3: implement INotifyPropertyChanged”:
// 3: implement INotifyPropertyChanged
protected void OnPropertyChanged(string propertyName)
{
if (this.PropertyChanged != null)
this.PropertyChanged(this, new PropertyChangedEventArgs(propertyName));
}
public event PropertyChangedEventHandler PropertyChanged;
Now let’s have a look at the scalar properties. Properties are accessible directly via the persistent object through the Properties property. So inside the loop iterating all persistent objects we’re going to iterate all properties of that persistent object and output matching properties. The output code will store each property in a private member, expose it via a public property and make use of the NotifyPropertyChanged-Event.
Put the following code at “// 1: create scalar properties”:
// 1: create scalar properties
<# foreach(var property in persistentObject.Properties)
{
#> private <#= property.Type #> _<#= property.Name #>;
// 4: placeholder for [Key] attribute
public <#= property.Type #> <#= property.Name #>
{
get
{
return _<#= property.Name #>;
}
set
{
_<#= property.Name #> = value;
OnPropertyChanged("<#= property.Name #>");
}
}
<# }
#>
Remember how we created an extensible property in the diagram that allowed us to mark properties as “Identifier”? Now we need to access this extensible property in order to decorate those properties with the [Key] attribute used in the EntityFramework to design primary keys:
The property object has got a method named “GetExtensiblePropertyValue” that returns the value of an extensible property when the name of the extensible property is passed. Depending on the boolean value returned we’re going to output the [Key] attribute on the property.
Please replace the // 4: placeholder for [Key] attribute with the following code snippet:
<# if ((bool)property.GetExtensiblePropertyValue("Identifier"))
{
#> [System.ComponentModel.DataAnnotations.Key]
<# }
#>
And now finally to the most complicated part: the connections between Persistent Objects. At first glance the code we’re going to write seems redundant, but a Persistent Object can be the source or the target of an association, depending on how the association was created using the Persistent Object Model designer. That’s why we’re going to need two loops here – one for where the persistent object is the source, and one where the persistent object is the target of the association.
Then we need to decide if it’s a collection property (e.g. a bank managing a collection of accounts) or a single reference (e.g. a cash card belonging to only one customer).
Here is how it works for associations where the persistent object is the source. Place this code at // 2: create associations
// 2: create associations
<# foreach (tasl.Dsl.PersistentRelation relation in
persistentObject.Sources.TargetDomainRole.GetElementLinks(persistentObject))
{
if (relation.Source.Name == persistentObject.Name)
{
if (relation.TargetMultiplicity == tasl.Dsl.Multiplicity.ZeroMany)
{
// this is a collection property
#> private ObservableCollection<<#= relation.Target.Name #>>
_<#= relation.TargetRoleName #>
= new ObservableCollection<<#= relation.Target.Name #>>();
public ObservableCollection<<#= relation.Target.Name #>>
<#= relation.TargetRoleName #>
{
get
{
return _<#= relation.TargetRoleName #>;
}
set
{
_<#= relation.TargetRoleName #> = value;
OnPropertyChanged("<#= relation.TargetRoleName #>");
}
}
<# }
else
{
// this is a reference property
#> private <#= relation.Target.Name #> _<#= relation.TargetRoleName #>;
public <#= relation.Target.Name #> <#= relation.TargetRoleName #>
{
get
{
return _<#= relation.TargetRoleName #>;
}
set
{
_<#= relation.TargetRoleName #> = value;
OnPropertyChanged("<#= relation.TargetRoleName #>");
}
}
<# }
}
}
#> // 5: create target associations here
And now finally for those associations where the current persistent object is the target. This code should be placed at “// 5: create target associations here”:
<# foreach (tasl.Dsl.PersistentRelation relation in
persistentObject.Targets.TargetDomainRole.GetElementLinks(persistentObject))
{
if (relation.Target.Name == persistentObject.Name)
{
if (relation.SourceMultiplicity == tasl.Dsl.Multiplicity.ZeroMany)
{
// this is a collection property
#> private ObservableCollection<<#= relation.Source.Name #>>
_<#= relation.SourceRoleName #>
= new ObservableCollection<<#= relation.Source.Name #>>();
public ObservableCollection<<#= relation.Source.Name #>>
<#= relation.SourceRoleName #>
{
get
{
return _<#= relation.SourceRoleName #>;
}
set
{
_<#= relation.SourceRoleName #> = value;
OnPropertyChanged("<#= relation.SourceRoleName #>");
}
}
<# }
else
{
// this is a reference property
#> private <#= relation.Source.Name #> _<#= relation.SourceRoleName #>;
public <#= relation.Source.Name #> <#= relation.SourceRoleName #>
{
get
{
return _<#= relation.SourceRoleName #>;
}
set
{
_<#= relation.SourceRoleName #> = value;
OnPropertyChanged("<#= relation.SourceRoleName #>");
}
}
<#
}
}
}
#>
This completes the T4 template that generates C# code classes from the Persistent Object Model created in the second part of this blog series. The T4 template generated in this part can be reused for other Persistent Object Models as long as they provide an extensible property “Identifier” for Model Properties.
In the upcoming parts of this blog series we are going to use the code generated by this T4 Template to create a data persistence layer using a relational database. Based on the Persistent Object Model we’re going to create some basic UI for displaying and interacting with the domain specific data objects.
]]>
Part 1: Model Driven Development and Series Overview
Part 2: Create a Persistence Model using Tangible Modeling Tools
Part 3: Generating Domain Specific data objects using T4 and EntityFramework 5 CodeFirst
Part 4: Data Persistence and Versioning
Part 5: Generate a Basic UI using T4 and Windows Presentation Foundation
Tangible Persistence Model Diagram
Create a Persistent Object Model
Our Modeling Tools extend your copy of Visual Studio 2010 or Visual Studio 2012 by a set of UML-style diagram types and a designer for creating and editing those diagrams. The following diagram types ship with tangible Modeling Tools:
All of those diagram types are intended to be used in a Model Driven Development process and model parts of the domain specific knowledge. Besides modeling the knowledge to communicate ideas between the stakeholders, the diagrams provide functionality for easily creating platform specific code using T4 templates.
For each diagram type there is a sample in our free T4 Template Gallery.
In our blog series we’re going to use a tangible Persistence Model Diagram to visualize some domain specific knowledge and create data classes, a persistence layer and some basic user interface from it. So let’s have a closer look at the Persistence Model Diagram type:
First add a new .tasl file to your existing Visual Studio 2010 or Visual Studio 2012 project by right clicking the project and choosing “Add” > “New item” from the context menu. Select a “tangible Persistence Object Diagram” from the item category “tangible modeling tools” and name it e.g. “BlogSeries.tasl”.
Open the new .tasl-File in the designer and have a look at the Visual Studio Toolbox. The category “Persistent Object Model” provides you with items to build your domain model with.
Besides positioning and connecting toolbox items on a canvas the persistence object model of the tangible Modeling tools provides some additional features: those are model validation, auto-naming and extensible properties.
Validation
When you first open a new Persistence Model Diagram in the designer, Visual Studio will complain about not having a root object inside the diagram in the Error List. Visual Studio will also notify you if your persistent object model lacks proper connectivity between persistent objects: e.g. each persistent object needs to be reachable from the persistent root object via containment relationships.
Auto-Naming
When creating associations, tangible Modeling Tools will automatically create proper navigation property names. So creating a one-to-many relationship between the persistent objects “Person” and “Car” will result in a navigation property named “Cars” in the “Person” object and a navigation property “Person” in the “Car” object.
These properties will be kept in sync – so if you decide to rename the class “Car” into “AutoMobile”, the navigation property “Cars” will be renamed to “AutoMobiles”. There’s one exception to this rule: if you rename the navigation property manually to e.g. “Autos” it won’t be changed automatically, even if you rename the class again.
Extensible Properties
Extensible properties are the way to augment standard diagram models with custom information. If you are missing the possibility to store information to a persistent model, tangible Modeling Tools allow you to create this possibility yourself:
Open the “DefinedProperties” collection of a Toolbox Item in the Stereotype Editor and add the desired property to the item (we’ll use that feature later).
Now that we know everything about the features of the persistent object model, we need to create a domain specific (yet rather simple) sample model with which we’re going to start our Model Driven Development Process.
I came up with a very minimalistic model of a bank in which a bank serves customers by providing accounts and cash cards. A bank customer can obtain one or many cash cards, each one granting access to a single account.
Here is a screenshot of the final model built with the persistent object model designer:
Add a Persistent Root Object to the diagram by dragging it from the Toolbox onto the designer canvas. Name this object “Bank” either by double-clicking its header or changing the “Name”-Property in the Properties Window.
Add a Property to the Persistent Root Object. This can be done by dropping a Property Item from the Toolbox onto the Persistent Root Object or right-clicking the Root Object and choose “Add” > “Property”. Set the Name of the Property to “Id” and its Type to “Int32”. This property will serve us as unique identifier for a given bank in the persistence layer.
The same way add a “Name” property to the “Bank” object as a human readable identifier for a given bank.
Then drag a Persistent Object item onto the designer canvas and name it “Customer”. The customer object gets three properties: an “Id” property of the Int32-Type (same purpose as the Bank-Id-Property), a property “FirstName” and a property “LastName”, both typed “string”.
Now connect the persistent root object with the “Customer” object using a Containment relationship, because if a bank is removed from the market, there’s no need to keep track of what people were customers of that bank. Select the “Containment” item in the Toolbox and then drag a dotted line from the Persistent Root Object to the “Customer” object.
A blue line will be drawn between the two objects with a small diamond shape at the side of the Persistent Root Object, indicating that the bank is the source of this containment, held “responsible” for the “Customer” object. Next to the line the navigation property names and multiplicities are displayed: "Bank” and “One” on the side of the Root Object and “Customers” and “ZeroMany” at the other end.
That information is read like this: “A bank has zero or many customers” and will result in a property “Customers” at the “Bank” object containing a collection of “Customer” objects. The other way round it means “A customer belongs to a single bank” resulting in a property named “Bank” in the “Customer” object referencing the only “Bank” object that customer belongs to.
Add another Persistent Object to the diagram and name it “CashCard”. Give it three Properties: “Id” (Int32), “Expiration” (DateTime) and PIN (string). Connect it to the “Customer” object via another containment dragged from “Customer” to “CashCard”.
This may be interpreted as follows: If a customer quits the service of a bank, all his CashCards become invalid. There is no need for a containment connection directly between “Bank” and “CashCard”, because the “CashCard” object is reachable from the Persistent Root Object via the path “Bank” > “Customer” > “CashCard”.
In our specific domain a bank would not create cash cards without the need to give it to a customer.
A bank holds an arbitrary amount of accounts. So add a third Persistent Object to our model and name it “Account”. An account contains an identifier (add an “Id” property of type “Int32”), an account number (type “string”) and information about its current rate (type “double”).
Since the bank manages all the accounts, the “Account” object is connected to the root object via a containment relationship.
But between the objects “Account” and “CashCard” we’re going to use an Association connection. On the one hand because the “CashCard” object is already reachable from the Persistent Root Object and on the other hand, because a customer can still carry his cash card around, even if the account has been deleted. So connect the two objects with an association with the “Account” object as the source.
All objects in our model have an “Id” property. But this property is not different to any other property in the same object. That’s why we want to decorate this property with a flag that states “This one is the identifier property”.
Now we’re going to use the Extensible Property feature mentioned earlier:
Click somewhere inside an empty area in the model designer so that the the Properties-Window shows the properties of the “PersistentObjectModel” and click on the “…” button of the “DefinedStereoTypes” property:
This will open the “StereoType Collection Editor”. Select the member “Property” in the list on the left and click the “…” button of its “DefinedProperties” property to open the “ExtensibleProperty Collection Editor”. Add a new extensible property and set its default value to “False”, its name to “Identifier” and the Type to “System.Boolean”.
That way a new property will appear in the Properties Window each time you select a property inside a Persistent Object named “Identifier” and expecting a value either “True” or “False”. By default it will be set to “False”.
Close the windows again and select the “Id” property of the “Bank” object. Look at the Properties window and change the “Identifier” property to “True”. Do the same to all “Id” properties of the model.
Congratulations! You just created your first domain specific model to serve as a basis for generating data objects and a user interface in a Model Driven Development Process.
Based on this Model we’re going to continue the following parts of our blog series on Model Driven Development.
In part 3 we’re going to create data objects based on this model using a T4 template to automatically generate C# code classes. Part 4 will create a data access layer for this model and the last part will generate a basic UI to create and manipulate data defined in this domain specific banking model.
]]>
In order to reconstruct all steps presented in this blog series, you need the following:
This first part of the blog series talks about the principles behind the Model Driven Development and tangibles contribution to implement this development process. Finally we give an overview how this blog series continues.
What is Model Driven Development?
Tangible Engineering’s support for MDD
Overview of MDD Blog Series
Model Driven Development (MDD) is an approach to design and develop software based on abstract but human-elaborated models using domain specific knowledge. These models usually are represented by diagrams like Component Diagrams, Distribution Diagrams, Activity Diagrams and/or Class Diagrams. While designing the resulting software, architects use these diagrams to communicate ideas and requirements between the different stakeholders (End Users, Decision Makers, Software Developers, …).
Thus MDD is considered useful when the created domain specific models make sense to the domain users as well as serve as a basis for implementing the system. The actual implementation can either be done manually or assisted by automatic code generation, e.g. in a rapid prototype scenario.
In the implementation process the domain specific models are also referred to as “platform independent models”, since their information is valid no matter what platform or programming language will be used to create the software. Either the manual code writing or a code generation process transform this independent model into a platform dependent model e.g. for a specific operation system.
The advantage of automated code generation is, that changes need to be applied only to the platform independent (domain specific) model. All other artifacts can be automatically regenerated and then contain the desired changes.
The product portfolio of tangible engineering GmbH comprises several components to be used in a Model Driven Development process:
Although – as previously mentioned – Model Driven Development usually uses several different models interacting and completing each other, we will focus in this series on domain specific Persistence Models and create a persistence layer, a data access layer and a basic user interface from those models:
Part 1: Model Driven Development and Series Overview
Part 2: Create a Persistence Model using Tangible Modeling Tools
Part 3: Generating Domain Specific data objects using T4 and EntityFramework 5 CodeFirst
Part 4: Data Persistence and Versioning
Part 5: Generate a Basic UI using T4 and Windows Presentation Foundation
Before diving in the Model Driven Development series, we should already start thinking in models. The following graphic shows a model of what we’ll walk through in the four upcoming parts:
We’re going to put some domain specific knowledge of an imaginary customer and create a Persitence Model Diagram (.tasl-File) from it. A T4 template will use this Model file to generate ready-to-use C# EntityFramework Data Access Objects which will allow us to store Data in a relational database.
Another T4 template will transform the Knowledge inside the Persistence Model to generate a Basic User Interface accessing the previously generated Data Objects.
In order to create a fully functional software we would need to manually extend the generated code artifacts by a business logic layer and customize the basic user interface. To achieve this we could again use models from the tangible Modeling Tools but this is not covered in this series.
The artifacts being developed or presented during this series do not claim to be omnipotent. They are merely a showcase of basics that can be achieved using tangible engineering products. You are free to use to improve the results of this series to match your needs and use them in your solutions.
If you need further assistance or you are looking for a partner in MDD, please contact us at info@tangible-engineering.com.
]]>In this sample we will walk through a scenario that includes the usage of state diagrams and T4 templates. We will create a sample application that implements an alarm clock based on a state machine. The code for this machine will be generated by a T4 template based on the previously designed state diagram.
This article consists of the following chapters:
You can download the full sample code inside a Visual Studio Solution here: T4-StateMachineSample.zip (60K)
On one hand the idea behind this article is to describe and explain the State Diagram of the the tangible T4 modeling tools. This includes the basic graphical elements and the code classes behind those elements. On the other hand I want to give an intermediate but non-trivial T4 scenario as an example of the power of T4 Templates.
In addition this article will provide a complete and easily adaptable sample for you to download and reuse.
It is not easy to find a scenario that fits both requirements: easy enough to fit into an example and complex enough to be non-trivial. So I chose to create a WPF Desktop Application that implements an Alarm Clock that internally is a state machine.
This is the the state diagram we will be using for the Alarm Clock: It contains a StartPoint element (the black dot) and three states the state machine will transition between depending on user actions. The start point and states are connected via flows (represented as arrows) that indicate from which state the machine can go into what other state. The direction is determined by the direction of the arrows.
A Transition is triggered by a Guard (the text on an arrow before the “/” character) and might result in an Effect (the text after the “/” character). When entering a state, that state may execute some entry actions and when leaving it again, it may execute exit actions.
Usually a state diagram has got an EndPoint, but since our Application does not have and “End”, the state machine will run forever.
The Alarm Clock state machine will start in a state that is equivalent to the start point and wait for the user action “Start” and wait for the user to start the machine. When starting it will notify its environment about the start with an “MachineStarted” effect and transition to the “Unarmed” state.
In this state the user will see the current time and is given the possibility to set an alarm time. Once the user set the alarm time, the machine will go to the “Armed” state. Entering the “Armed” state it will confirm the alarm time in the entry action “DisplayArmedSign” and start an internal timer (“StartTimer”) to evaluate when the alarm is to be set off.
In the “Armed” state the user may disable the alarm which brings the state machine back to the Unarmed state. Otherwise the machine transitions to the “Alarm” state once the alarm time has been matched. On exiting the “Armed” state, the internal timer used in that state will be stopped.
The user can turn the alarm off and the Alarm Clock state machine will go to the “Unarmed” state again.
This scenario covers most of the capabilities a state diagram has.
The following screenshot displays the UI of the WPF application we are going to create:
In the center of the window is a TextBlock that displays the current time and is updated every second. On the right hand side are some controls that allow the user to interact with the Alarm Clock state machine:
The code sample consists of multiple steps:
I will be using Visual Studio 2012 for the screenshots but this sample works perfectly with Visual Studio 2010, too. You might want to start with a new WPF Application project.
Add a new tangible State Diagram from the “Add New Item” dialog and name it “AlarmClock.tastate”.
Open the diagram and start dragging Elements from the Toolbox onto the diagram pane. Since every state diagram needs a start point, start by adding a Start Point to the diagram.
The same way drag a new State into the diagram. Change its name in the Property Grid to “Unchanged”.
Connect the Start Point to the “Unchanged” state by selecting the Flow item in the toolbox and dragging an arrow from the Start Point to the “Unchanged” state.
In the Property Grid of the Flow element set the “Event [Guard]” value to “Start” and the “Effect” to “MachineStarted”.
Continue adding States and Flows to the diagram until you complete the Alarm Clock Model.
The purpose of the T4 template is to create all necessary classes and general logic in order to create a ready-to-use state machine. Additionally we want to be able to reuse the template for any state machine we will design in the future.
So the first step is to think of basic elements every state machine needs. In the second step the special elements of the specific machine needs to be generated.
For our basic model I decided to create the following structure:
In the specific model for each state in the diagram a partial class that inherits from StateBase will be created and it will contain partial methods for all Entry actions and all Exit actions. Each guard of a flow element will be turned into a partial class that inherits from TriggerBase. Thus the user can extend the logic of the triggers.
Finally a partial class for the state machine will be created and inherit from StateMachine. Based on all Flows the transition logic of the State Machine will be created. Each Effect on a Flow element will be turned into an C#-Event of the state machine class.
Add a new blank T4 template file to your solution next to the AlarmClock.tastate file. Name it “StateMachineTemplate.tt”.
The first lines of the T4 template need to look like this, telling the T4 engine that we are processing a tangible State Diagram in this template. Those lines also provide us with IntelliSense for the State Diagram object model in the template:
<#@ template
inherits="Microsoft.VisualStudio.TextTemplating.VSHost.ModelingTextTransformation"
debug="true" hostSpecific="true" #>
<#@ output extension=".cs" #>
<#@ TangibleStateDiagram processor="TangibleStateDiagramDirectiveProcessor"
requires="fileName='AlarmClock.tastate'"
provides="StateGraph" #>
<#@ assembly name="tangible.Modelling.StateDiagrams.Dsl.10.dll" #>
There are other assemblies and namespaces we are going to use inside the T4 template. Thus we need to add the following lines to the template:
<#@ assembly name="System.Core" #>
<#@ import namespace="System" #>
<#@ import namespace="System.IO" #>
<#@ import namespace="System.Linq" #>
<#@ import namespace="System.Collections" #>
<#@ import namespace="System.Collections.Generic" #>
After having all references and namespaces included for developing the T4 template, we can start generating C# code. At first we need to create the base classes TriggerBase, StateBase and StateMachine. To provide all people who are going to use our template with those base classes, we’re going to include them in the template. This is not much of dynamic code generation but rendering text.
So directly after the Template declarations add the static text for the base classes:
Namespace imports
The generated code needs namespace imports, too, so that in can be compiled. Add the following imports to the output code of the T4 template:
using System;
using System.ComponentModel;
TriggerBase class
The TriggerBase class is an abstract class without any functionality. Add the following line of code to the output code of the T4 template:
public abstract class TriggerBase { }
StateBase class
The StateBase class also is an abstract class with a public constructor that takes the instance of a state machine as a parameter. (Don’t worry that we haven’t done anything for a StateMachine class yet. This is just not-compiled text so far.)
The StateBase class has a method “Initialize” that can be implemented by inheriting classes and two methods “OnEntry” and “OnExit” that must be implemented by inheriting classes. Since transitions between states are invoked by triggers, the “OnEntry” and “OnExit” methods take a Trigger as a parameter. (Again, no worries because Triggers don’t exist yet.).
public abstract class StateBase
{
public StateBase(StateMachine machine)
{
this.StateMachine = machine;
this.Initialize();
}
public StateMachine StateMachine { get; private set; }
protected virtual void Initialize()
{
}
public abstract void OnEntry(TriggerBase trigger);
public abstract void OnExit(TriggerBase trigger);
}
StateMachine class
The StateMachine class again is an abstract class providing a public constructor and an Initialization method. It contains a property “CurrentState” that holds an instance of the State class the machine is currently in. The method “TransitionToNewState” allows the state machine to go into another state. This method takes the instance of the new state and the trigger that caused this transition as parameters. The state machine also contains an abstract Method “ProcessTrigger” that will be called from outside the machine to trigger transitions between states.
For convenience the StateMachine class implements the interface INotifyPropertyChanged.
public abstract partial class StateMachine : INotifyPropertyChanged
{
public StateMachine()
{
this.Initialize();
}
protected virtual void Initialize() { }
public void TransitionToNewState(StateBase newState, TriggerBase causedByTrigger)
{
// exit the current state
if (this.CurrentState != null)
this.CurrentState.OnExit(causedByTrigger);
this.CurrentState = newState;
// enter the new state
if (this.CurrentState != null)
this.CurrentState.OnEntry(causedByTrigger);
}
private StateBase _CurrentState;
public StateBase CurrentState
{
get { return _CurrentState; }
private set
{
_CurrentState = value; OnPropertyChanged("CurrentState");
}
}
public abstract void ProcessTrigger(TriggerBase trigger);
protected void OnPropertyChanged(string propertyName)
{
if (this.PropertyChanged != null)
this.PropertyChanged(this, new PropertyChangedEventArgs(propertyName));
}
public event PropertyChangedEventHandler PropertyChanged;
}
So far this is no magic. You may try to Transform the template by right clicking it in the Solution explorer and select “Run Custom Tool”. It will generate the classes in C# code and you can compile this code.
Now we need to generate the code that is different depending on the input State Diagram file.
At first we are going to create all triggers that may cause the transition between two states and generate classes that inherit from TriggerBase for each of them. Those generated Trigger classes are going to be partial classes so that they may be customized without losing all manual changes when retransforming the template.
In the State Diagram Guards are a property of the Flow class. Flow elements can only accessed via the State Elements they are connected to. To get a list of all guards we need to query all States and select all ingoing Flows. Since a trigger might trigger more than one transition, we need to assure that we generate each trigger only once.
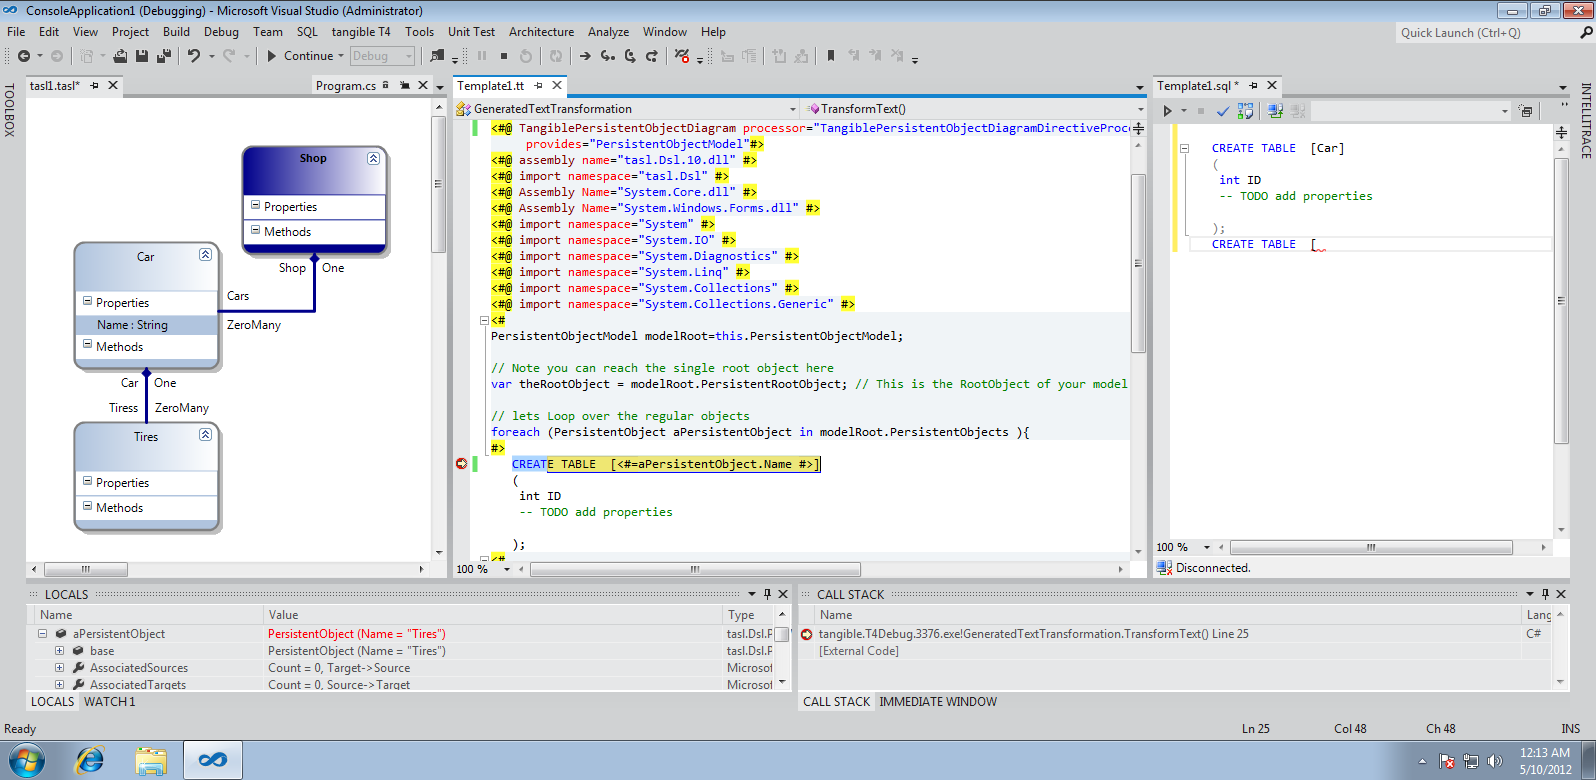
This time we need to write T4 code blocks. Inside the code block we acquire the trigger names and iterate them in a loop. For each item we generate output code that builds up the resulting class.
T4 code blocks are embraced by <# and #> tags. I’ve marked the output code with a white background color. Printing computed values from the T4 code is marked with <#= and #>.
<# // find all trigger names
var allTriggerNames = new List<string>();
foreach(var state in this.StateGraph.FlowElements.OfType<State>())
foreach(var flow in state.FlowFrom.SourceDomainRole.GetElementLinks<Flow>(state))
if (!allTriggerNames.Contains(flow.Guard))
allTriggerNames.Add(flow.Guard);
// iterate all triggers
foreach(var triggerName in allTriggerNames)
{
#> public partial class <#= triggerName #>Trigger : TriggerBase { }
<# }
#>
If you are going to transform the T4 template now, the code block above will produce the following output C# code:
public partial class DisableAlarmTrigger : TriggerBase { }
public partial class UserTurnedAlarmOffTrigger : TriggerBase { }
public partial class StartTrigger : TriggerBase { }
public partial class SetAlarmTimeTrigger : TriggerBase { }
public partial class AlarmTimeMatchesTrigger : TriggerBase { }
The same way we are going to create all states of the state machine. But this time we need to more code generation – which makes the T4 template code more confusing.
We will iterate all states and find all entry and exit actions. Since we allow multiple actions on entry or exit, we’re going to split the values in the “Entry Action” and “Exit Action” properties by the NewLine-Character and generate partial methods for each of them.
<# // iterate all states of the diagram
foreach(var state in this.StateGraph.FlowElements.OfType<State>())
{
// find all entry and exit actions
var entryActions = state.EntryAction.Split(new string[] { Environment.NewLine },
StringSplitOptions.RemoveEmptyEntries);
var exitActions = state.ExitAction.Split(new string[] { Environment.NewLine },
StringSplitOptions.RemoveEmptyEntries );
// start generating the class
#> public partial class <#= state.Name #>State : StateBase
{
public <#= state.Name #>State(StateMachine machine) : base(machine) { }
#region Entry
public override void OnEntry(TriggerBase causedByTrigger)
{
// call all entry actions
<# // render the method call for each entry action
foreach(var action in entryActions)
{
#> <#= action #>(causedByTrigger);
<# }
#> }
<# // render the method definition for each entry action
foreach(var action in entryActions)
{
#> partial void <#= action #>(TriggerBase causedByTrigger);
<# }
#> #endregion
#region Exit
public override void OnExit(TriggerBase causedByTrigger)
{
// call all exit actions
<# // render the method call for each exit action
foreach(var action in exitActions)
{
#> <#= action #>(causedByTrigger);
<# }
#> }
<# // render the method definition for each exit action
foreach(var action in exitActions)
{
#> partial void <#= action #>(TriggerBase causedByTrigger);
<# }
#> #endregion
}
<# }
The Start State
The initial state of the state machine is represented by the StartPoint Element in the diagram. So this state is not covered in the loop over all states above. We need to provide this class manually outside any T4 code block:
public partial class StartState : StateBase
{
public StartState(StateMachine machine) : base(machine) { }
public override void OnEntry(TriggerBase causedByTrigger) { }
public override void OnExit(TriggerBase causedByTrigger) { }
}
Generating the state machine now is straight forward: At first we get a list of all triggers and all effects and start generating the state machine. For each effect we are going to create an EventHandler. The logic of the state machine goes in the ProcessTrigger method: for each state we need to check if the trigger (that has been passed as a parameter) may cause a transition. If so, we need to perform the transition. The Start state has to be processed manually again.
<# // get a (default) name for the state machine
var machineName = !string.IsNullOrEmpty(this.StateGraph.Name)
? this.StateGraph.Name
: "GeneratedStateMachine";
// get all triggers and effects
var allTriggers = new List<string>();
foreach(var state in this.StateGraph.FlowElements.OfType<State>())
foreach(var flow in state.FlowFrom.SourceDomainRole.GetElementLinks<Flow>(state))
if (!allTriggers.Contains(flow.Guard))
allTriggers.Add(flow.Guard);
var allEvents = new List<string>();
foreach(var state in this.StateGraph.FlowElements.OfType<State>())
foreach(var flow in state.FlowFrom.SourceDomainRole.GetElementLinks<Flow>(state))
if (!allEvents.Contains(flow.Guard))
allEvents.Add(flow.Guard);
// start generating the state machine
#> public partial class <#= machineName #> : StateMachine
{
public <#= machineName #>()
{
// initially we go into the StartState.
this.TransitionToNewState(new StartState(this), null);
}
public override void ProcessTrigger(TriggerBase trigger)
{
if (this.CurrentState == null) return;
if (trigger == null) throw new ArgumentException("tigger must not be null");
// determine what action to take based on the current state
// and the given trigger.
<# // iterate all states in the diagram
foreach(var state in this.StateGraph.FlowElements.OfType<State>())
{
// check what transitions may be made from this state
var possibleTransitions = state.FlowTo.SourceDomainRole
.GetElementLinks<Flow>(state);
#> if (this.CurrentState is <#= state.Name #>State)
{
<# foreach(var transition in possibleTransitions)
{
#> if (trigger is <#= transition.Guard #>Trigger)
{
this.TransitionToNewState(new <#= transition.FlowTo.Name #>State(this),
trigger);
<# if (!string.IsNullOrEmpty(transition.Effect))
{
#> On<#= transition.Effect #>();
<# }
#> return;
}
<# }
#> }
<# }
#>
// the start state
if (this.CurrentState is StartState)
{
<# var startPoint = this.StateGraph.FlowElements.OfType<StartPoint>()
.FirstOrDefault();
if (startPoint == null)
throw new NullReferenceException("There is no start point in the diagram.");
// get all transitions from the start point
var possibleStartTransitions =
startPoint.FlowTo.SourceDomainRole.GetElementLinks<Flow>(startPoint);
foreach(var transition in possibleStartTransitions)
{
#> if (trigger is <#= transition.Guard #>Trigger)
{
this.TransitionToNewState(new <#= transition.FlowTo.Name #>State(this),
trigger);
<# if (!string.IsNullOrEmpty(transition.Effect))
{
#> On<#= transition.Effect #>();
<# }
#> return;
}
<# }
#> }
}
#region Events
<# // create events for all Effects that are raised
// by a transition
foreach(var eventName in allEvents)
{
#> protected void On<#= eventName #>()
{
if (this.<#= eventName #> != null)
this.<#= eventName #>(this, new EventArgs());
}
public event EventHandler <#= eventName #>;
<# }
#> #endregion
}
With the complete template we generated in step 2 the state machine, triggers and states can be generated by right clicking the T4 file in the Solution Explorer and choosing “Run Custom Tool”. But there are still a few steps missing to achieve the full functionality of the Alarm Clock. Unfortunately these steps cannot be generated, because they cannot be designed in the state diagram.
The missing steps are:
Since all classes that are generated by the T4 template are partial classes, we can extend them in another file without losing the extensions when the template regenerates the code. Now add a C# code file to the solution next to the T4 template and name it “StateMachineExtensions.cs”.
Pass an alarm to the state machine
In order to pass an alarm time to the state machine, we’re going to extend the Trigger class by a property that stores the time when the alarm has to go off. Add the following code to the “StateMachineExtensions.cs” file:
partial class SetAlarmTimeTrigger
{
public DateTime AlarmTime { get; set; }
}
Test when the alarm is to go off
To achieve this we’re going to use the entry action “StartTimer” and “EndTimer” of the "Armed" state. In the “StartTimer” method we’re going to instantiate a Timer object that checks every second if the current time matches the time set by the SetAlarmTimeTrigger that has been passed as a parameter. In the exit action the timer is deactivated again.
Add the following code to the “StateMachineExtensions.cs” file:
partial class ArmedState
{
private DateTime alarmTime;
private Timer _t;
partial void StartTimer(TriggerBase causedByTrigger)
{
_t = new Timer(1000) { Enabled = true };
_t.Elapsed += _t_Elapsed;
}
void _t_Elapsed(object sender, ElapsedEventArgs e)
{
if (DateTime.Now >= alarmTime)
{
EndTimer(null);
this.StateMachine.ProcessTrigger(new AlarmTimeMatchesTrigger());
}
}
partial void EndTimer(TriggerBase causedByTrigger)
{
_t.Enabled = false;
try
{
_t.Elapsed -= _t_Elapsed;
}
catch { }
}
}
Reference the current time
In our scenario we want the Alarm Clock only to work when the state machine has been started. So we’re going to subscribe to the “MachineStarted” event and start another timer that only produces the current time to be displayed in the UI. Additionally we’re going to add a “CurrentTime” property to the AlarmClock state machine to be able to bind the current time to the UI.
partial class AlarmClock
{
protected override void Initialize()
{
base.Initialize();
// in order to display the current time we need a timer
// that automatically updates the CurrentTime-Property
this._Timer = new Timer(1000) { Enabled = false };
this._Timer.Elapsed += _Timer_Elapsed;
// this timer is only enabled after the state machine
// was started. So we're listening to the Machine-Started Event.
this.MachineStarted += AlarmClock_MachineStarted;
}
void AlarmClock_MachineStarted(object sender, EventArgs e)
{
this._Timer.Enabled = true;
}
void _Timer_Elapsed(object sender, ElapsedEventArgs e)
{
this.CurrentTime = DateTime.Now;
}
private Timer _Timer;
private DateTime _CurrentTime;
public DateTime CurrentTime
{
get { return _CurrentTime; }
set { _CurrentTime = value; OnPropertyChanged("CurrentTime"); }
}
}
Now all that is left to do is to create a nice user interface for the Alarm Clock state machine. For this sample I built a simple WPF window containing a TextBlock displaying the current time, a TextBox where the user can enter the desired alarm time and some Buttons: The first button starting the alarm clock state machine, the second one arming it, the third disarming it and the fourth ending the alarm.
The buttons are only enabled when clicking them triggers a transition in the state machine. For example the button that starts the state machine is only enabled when the machine is in the “Start” state.
At first we need to create some converters that allow us to use bindings to make the state machine have effect to the UI. Then we need to provide the Window with a ViewModel. Finally we can design the User Interface and start the application.
I decided to store all converters in a subdirectory “Converter” in the Visual Studio Solution.
DateTimeConverter
This converter will format a given DateTime object by a given format string. This way you can customize the look of the display of the alarm clock. Add a new C# code file to the “Converter” subdirectory and name it “DateTimeConverter.cs”. Let the class “DateTimeConverter” implement the interface IValueConverter.
This converter is going to be a one-direction-converter. That’s why I am only writing code in the “Convert” method.
public class DateTimeConverter : IValueConverter
{
public object Convert(object value, Type targetType, object parameter,
System.Globalization.CultureInfo culture)
{
if (!(value is DateTime))
throw new ArgumentException("value must be of type DateTime");
var dtValue = (DateTime)value;
var param = (parameter as string) ?? "HH:mm:ss";
return dtValue.ToString(param);
}
public object ConvertBack(object value, Type targetType, object parameter,
System.Globalization.CultureInfo culture)
{
throw new NotImplementedException();
}
}
InStateConverter
This converter will determine if the alarm clock state machine is in a given state. The name of the state to be tested will be passed in the parameter value. The value to convert will be the current state of the state machine. If the name of the current state equals the parameter value, the converter returns “true”, otherwise “false”.
public class InStateToVisibilityConverter : IValueConverter
{
public object Convert(object value, Type targetType, object parameter,
System.Globalization.CultureInfo culture)
{
if (!(value is StateBase))
throw new ArgumentException("value must be of type StateBase");
var state = value as StateBase;
var param = parameter as string;
if (state == null) return false;
else return (state.GetType().Name == param);
}
public object ConvertBack(object value, Type targetType, object parameter,
System.Globalization.CultureInfo culture)
{
throw new NotImplementedException();
}
}
InStateToVisibilityConverter
This converter is very similar to the InStateConverter but instead of a boolean value it returns a visibility value: if the name of the current state equals the parameter value, the converter returns “Visible”, otherwise “Collapsed”. We’re going to use this to display UI elements when the state machine is in a certain state.
public class InStateConverter : IValueConverter
{
public object Convert(object value, Type targetType, object parameter,
System.Globalization.CultureInfo culture)
{
if (!(value is StateBase))
throw new ArgumentException("value must be of type StateBase");
var state = value as StateBase;
var param = parameter as string;
if (state == null) return Visibility.Collapsed;
else return (state.GetType().Name == param) ? Visibility.Visible
: Visibility.Collapsed;
}
public object ConvertBack(object value, Type targetType, object parameter,
System.Globalization.CultureInfo culture)
{
throw new NotImplementedException();
}
}
To be able to use the state machine in the application, create a ViewModel class for the MainWindow. I did this inside the MainWindow.xaml.cs file and created a public class named “MainWindowViewModel”. The view model implements the INotifyPropertyChanged interface and stores the state machine in a property “AlarmClock”.
Then the view model provides methods to interact with the state machine. There are for Methods that send a trigger to the state machine: “StartAlarmClock”, “SetAlarmTime”, “DisarmAlarmClock” and “TurnAlarmOff”.
public class MainWindowViewModel : INotifyPropertyChanged
{
public MainWindowViewModel()
{
this.AlarmClock = new AlarmClock();
}
private AlarmClock _AlarmClock;
public AlarmClock AlarmClock
{
get { return _AlarmClock; }
set { _AlarmClock = value; OnPropertyChanged("AlarmClock"); }
}
public void StartAlarmClock()
{
AlarmClock.ProcessTrigger(new StartTrigger());
}
public void SetAlarmTime(DateTime alarmTime)
{
AlarmClock.ProcessTrigger(new SetAlarmTimeTrigger() { AlarmTime = alarmTime });
}
public void DisarmAlarmClock()
{
AlarmClock.ProcessTrigger(new DisableAlarmTrigger());
}
public void TurnAlarmOff()
{
AlarmClock.ProcessTrigger(new UserTurnedAlarmOffTrigger());
}
protected void OnPropertyChanged(string propertyName)
{
if (this.PropertyChanged != null)
this.PropertyChanged(this, new PropertyChangedEventArgs(propertyName));
}
public event PropertyChangedEventHandler PropertyChanged;
}
Next we’re going to design the user interface. There’s not much to talk about the UI design. Make sure you reference the XML namespace of the previously created converters in the <Window /> tag. Then create an instance of each converter in the <Window.Resources /> tag. After that you can design the user interface to match the image above.
Here is a single example how to bind the current state of the state machine to the “Enabled” property of a button.
<Button IsEnabled="{Binding Path=AlarmClock.CurrentState,
Converter={StaticResource InStateConverter},
ConverterParameter='StartState'}" />
With this in mind the rest of the XAML should be self explanatory:
<Window x:Class="StateMachineSample.MainWindow"
xmlns="http://schemas.microsoft.com/winfx/2006/xaml/presentation"
xmlns:converter="clr-namespace:StateMachineSample.Converter"
xmlns:x="http://schemas.microsoft.com/winfx/2006/xaml"
Title="MainWindow" Height="350" Width="525">
<Window.Resources>
<!-- Converts a DateTime into a given Format -->
<converter:DateTimeConverter x:Key="DateTimeConverter" />
<!-- Converts a State into a boolean compared by its name -->
<converter:InStateConverter x:Key="InStateConverter" />
<!-- Converts a State into a Visibility value compared by its name -->
<converter:InStateToVisibilityConverter x:Key="InStateToVisibilityConverter" />
</Window.Resources>
<Grid>
<Grid.RowDefinitions>
<RowDefinition Height="75" />
<RowDefinition Height="*" />
<RowDefinition Height="75" />
</Grid.RowDefinitions>
<Grid.ColumnDefinitions>
<ColumnDefinition Width="*" />
<ColumnDefinition Width="150" />
</Grid.ColumnDefinitions>
<!-- This Textblock displays the current time -->
<TextBlock Text="{Binding Path=AlarmClock.CurrentTime,
Converter={StaticResource DateTimeConverter},
ConverterParameter='HH:mm:ss'}"
FontSize="40"
Margin="5"
Grid.Row="1"
HorizontalAlignment="Center" />
<!-- This button starts the state machine alarm clock
It is only enabled when the machine has not been started yet -->
<Button x:Name="cmdStart"
Content="1.) Start State Machine"
IsEnabled="{Binding Path=AlarmClock.CurrentState,
Converter={StaticResource InStateConverter},
ConverterParameter='StartState'}"
Grid.Column="2"
Margin="5"
Click="cmdStart_Click" />
<!-- This area manages the alarm time -->
<StackPanel Grid.Column="1" Grid.Row="1" Margin="5">
<!-- In this texbox goes the desired alarm time
It is only enabled when the AlarmClock is not armed yet. -->
<TextBox x:Name="txtAlarm"
Text="12:00:00"
IsEnabled="{Binding Path=AlarmClock.CurrentState,
Converter={StaticResource InStateConverter},
ConverterParameter='UnarmedState'}" />
<!-- This button arms the Alarm clock
It is only enabled when the AlarmClock is not armed yet. -->
<Button x:Name="cmdArm"
IsEnabled="{Binding Path=AlarmClock.CurrentState,
Converter={StaticResource InStateConverter},
ConverterParameter='UnarmedState'}"
Content="2.) Arm AlarmClock"
Margin="0,5,0,0"
Click="cmdArm_Click" />
<!-- This button disarms the Alarm clock
It is only enabled when the AlarmClock is armed. -->
<Button x:Name="cmdDisarm"
Content="2.) Disarm AlarmClock"
IsEnabled="{Binding Path=AlarmClock.CurrentState,
Converter={StaticResource InStateConverter},
ConverterParameter='ArmedState'}"
Margin="0,5,0,0"
Click="cmdDisarm_Click" />
</StackPanel>
<!-- This image is the actual "alarm"
It is only visible when the Alarm goes off. -->
<Image Source="Images/bell.png"
Visibility="{Binding Path=AlarmClock.CurrentState,
Converter={StaticResource InStateToVisibilityConverter},
ConverterParameter='AlarmState'}"
Grid.Row="2" />
<!-- This button turns the alarm off again.
It is only enabled when the Alarm goes off. -->
<Button x:Name="cmdOff"
Content="3.) Turn alarm off"
IsEnabled="{Binding Path=AlarmClock.CurrentState,
Converter={StaticResource InStateConverter},
ConverterParameter='AlarmState'}"
Margin="5"
Grid.Row="2"
Grid.Column="1"
Click="cmdOff_Click" />
</Grid>
</Window>
Last but not least we need to instantiate the view model and connect the Click-Event handlers of all the buttons to the View Model. This happens in the MainWindow.xaml.cs:
public partial class MainWindow : Window
{
public MainWindow()
{
InitializeComponent();
this.Loaded += MainWindow_Loaded;
}
MainWindowViewModel _ViewModel;
void MainWindow_Loaded(object sender, RoutedEventArgs e)
{
_ViewModel = new MainWindowViewModel();
this.DataContext = _ViewModel;
}
private void cmdStart_Click(object sender, RoutedEventArgs e)
{
_ViewModel.StartAlarmClock();
}
private void cmdArm_Click(object sender, RoutedEventArgs e)
{
var date = DateTime.Parse(txtAlarm.Text);
_ViewModel.SetAlarmTime(date);
}
private void cmdDisarm_Click(object sender, RoutedEventArgs e)
{
_ViewModel.DisarmAlarmClock();
}
private void cmdOff_Click(object sender, RoutedEventArgs e)
{
_ViewModel.TurnAlarmOff();
}
}
Voilà, that’s it! Now just hit F5 and check this awesome AlarmClock based on a state machine out.
In this non-trivial sample of how to use tangible State Diagrams and T4 templates we developed a state machine that implements an alarm clock.
First we designed the logic of the alarm clock with a state diagram. Then we created a basic and reusable state machine that is generated by a T4 template and transformed the state diagram into a specific implementation of that state machine.
After that we completed the logic of the alarm clock by extending the generated classes with individual code. Finally we accessed the state machine from a WPF sample application.
You can download the full sample code inside a Visual Studio Solution here: T4-StateMachineSample.zip (60K)
]]>
In the Pro Version our T4 Editor provides the functionality of transforming selected templates when building a Visual Studio Solution. This means: every time you hit F5, debug or deploy your project all selected templates are transformed and the output data is always up to date!
To mark a template in your Solution for transformation on build, set the “Transform on Build” Property in the Property Grid to “True”.
When using a Command Line Tool at the Pre-Build Event of Visual Studio you cannot transform Templates that are host specific, access the Visual Studio Automation Interface or use variables like $SolutionDir.
The “Transform on Build” capability of the tangible T4 Editor is integrated into Visual Studio so there is no restriction to what Features can be used in the templates that are to be transformed.
The “Transform on Build” Feature is only available in the Pro Version. You can purchase the Pro Version here.
]]>This blob post demonstrates how to use the tangible T4 Editor and free template from its sample gallery to create multiple output files. The first part shows how to make a T4 Template generate two different output files with different content. The second part shows how to create multiple output files in different projects within your solution. Finally a summary of all necessary steps is given.
First create a T4 Template in your solution by selecting “Add” > “New Item” from the context menu of your project. Choose the item type “Blank T4 Template” from the “tangible T4 Editor” section and name it “MultipleOutputFiles.tt”.This template will contain the transformation code as in any other T4 Template scenario.
In addition to this template you need to use an includable T4 Template that provides the code that allows to output code into multiple files. This reusable template is available for free through the tangible T4 Editor Template Gallery.
Add another template to your project and locate it next to the “MultipleOutputFiles.tt” but this time choose “Reusable T4 Template” in the Add New Item-Dialog. Name this file “TemplateFileManagerV2.1.ttinclude”.
Your Solution explorer should look similar to this now:
Open the .ttinclude file by double clicking it and delete ALL its contents. Go to the tangible T4 Editor Template Gallery by right clicking somewhere inside the Editor window and selecting “Template Gallery.”
If you are prompted whether to download all available online templates to your local computer, choose “yes”. Otherwise you won’t be able to insert templates into your projects. In the TreeView on the left navigate to “.ttinclude (Use as Include-File)” > “.cs –> .cs” and select the entry “TemplateFileManagerV2.1”.
The template code will be shown in the preview part of the gallery.
Insert the code of this template to your file by clicking the “Insert Code” Button at the bottom of the Gallery screen.
Now that you obtained the code you need to include that file into the main Template “MultipleOutputFiles.tt”. To show you the parts that are really necessary, clear all content of this file, too.
Instead add the following lines:
<#@ template language=”C#” hostSpecific=”true” #>
<#@ output extension=”.cs” #>
This states that you will create your T4 directives with C# and the main output file will be “MultipleOutputFiles.cs”.
The next line will make the Templating Engine include the TemplateFileManager so that you can use its Methods and Classes within your Template:
<#@ include file=”TemplateFileManagerV2.1.ttinclude” #>
Having this file included you can create an instance of the TemplateFileManagerClass provided by the .ttinclude.
<#
var manager = TemplateFileManager.Create(this);
#>
Until now all output code you write goes to the default output file “MultipleOutputFiles.cs”. To Create another file call the StartNewFile() method on the TemplateFileManager object. After calling this method all output code will be rendered into a new file with the name passed as parameter. The extension of the new output file may differ from the extension of the default output file.
<#
var manager = TemplateFileManager.Create(this);
#>
// this output code will be written to MultipleOutputFiles.cs
<#
manager.StartNewFile(“Outputfile2.txt”);
#>
// this output code will be written to Outputfile2.txt
To make the File Manager write the files, call the Process() Method.
<#
manager.Process();
#>
To transform the T4 Template, right click the MultipleFileOutput.tt in the Solution Explorer and select “Run Custom Tool”.
Both files will be created under the node “MultipleFileOutput.tt” and contain the proper output code:
The TemplateFileManagerClass provides you with that functionality, too:
In order to create a new output file in another project of the solution currently opened in your Visual Studio, you need to pass more parameters to StartNewFile() Method.
<#
manager.StartNewFile(“Outputfile3.txt”,
“SomeOtherProject”,
“SubFolder”);
#>
This call will place the new output file named “Outputfile3.txt” in the project named “SomeOtherProject” in your currently opened solution within the folder “SubFolder”.
Make sure that a project named “SomeOtherProject” and a folder named “SubFolder” exist, otherwise the code generation will fail.
Omitting the parameter specifying the subfolder to place the output file in will make the TemplateFileManager create the output file in the root directory of the project.
This article demonstrated how to use the tangible T4 Editor to generate output to multiple files. The different output files can be placed in different projects within the solution currently opened in Visual Studio.
In short these are the steps necessary to create multiple output files:
If you want to put output files inside different projects within your solution use the overloads of the StartNewFile() method. Make sure that the projects and folders where you want to place the output files exists before transforming the template.
]]>We are glad to announce the availability of tangible T4 Editor 2.1 plus modeling tools for both VS2010 and VS2012 RTM. As usual you will find the updates on the visual studio gallery (VS2010 & VS2012).
Since Version 2.0 we added many useful features and worked on performance as well as support for VS2012 RTM. Lets look at the new features in more detail:
What is new?
Free Edition users will benefit from the following enhancements in Version 2.1:
- Support for VS 2012 RTM – tangible T4 Editor is the first available T4 Editor for a new Version of Visual Studio
- Full LINQ Query support in Statement Completion
- ASP.NET MVC Host support in IntelliSense
- Parameter Directive support in IntelliSense - template parameters are now available on this.
- Smart Indenting now assists you when writing templates
- Enhanced Brace-Matching – better visibility & also enabled for output code
- Current Word Highlighting is now available in T4 Editor.
- Option to show Line-Numbers
- More fine grained control of behavior via better Options Dialog & tangible T4 Menu
- Extensible Diagrams via Stereotypes – you can define custom properties e.g. IsRequired
- Custom Directive Processor support – if you use custom processor directive e.g. for a Microsoft UML Diagrams, Our Diagrams or from T4 Toolbox or you write your known you will notice that our IntelliSense now picks up Imports, Assembly-Reference and custom members provided by your directive processor automatically.
Pro Edition users will also enjoy these improvements:
- Improved Quick-Debugger now supports templates that use Visual Studio Automation (EnvDTE)
- Support for debugging parameter templates – parameters can be set in the properties window
- Add Code Generation Item Command - adds a T4 template for a defined input document and retransforms the template when the input document changes
- Format Output Document - applies a SmartFormat Command the generated output document
- Goto-Definition Command
- Code Generation for custom properties defined in Diagrams stereotypes via API from within a T4 Template. Access the value via the GetExtensiblePropertyValue Method on a ModelElement.
Bugs fixed:
- $(SolutionDir) was not working when used in an assembly directive
- Debug did not work if path to solution had a space
- Assembly Cache bug if dependend dll was not found
- Disables invalid T4 Intellisense in watch window (VS2012 RC/RTM only)
- Fixed issue when changing output language to VB
Thanks for all your valuable feedback on the 2.0 which made 2.1 possible
Tim, CEO Tangible Engineering GmbH
]]>We just released a small update which addresses smaller issues users reported as well missing statement completions for this.Host.<something> this.WriteLine and other DLLs which should work in Free Edition.
]]>tangible T4 Editor 2.0 is almost a 100% rewrite of the existing Version 1.0 product. It addresses nearly all feedback we got from you regarding feature wishes and change requests. Thank you for providing feedback in the past – we really read every piece of feedback and take action on it.
Free Edition Users will notice these improvements and changes which result from your feedback:
FREE Edition Licensing
You can use T4 Editor Free Edition as before. There no restrictions that prevent using it in commercial or private projects. Please read the EULA for the actual use rights.
PRO Edition Licensing
As tangible T4 Editor 2.x targets both VS2010 and VS2011 and it is a complete rewrite, added significant features it is considered a major upgrade which is reflected by the version number. The license typically comes with 12 months updates and support builds of 2.x version for both VS2011 and VS2012. You will need a 2.x Activation Key to activate the Pro Version. You can order a license via our web shop.
The “Buy” button can be found on this page: http://t4-editor.tangible-engineering.com/buy.html
Upgrades from 1.x PRO Versions
As this new Version is a major upgrade (not update) which allows you to use the product even with VS 11, adds significant features and is a complete rewrite we need to charge you for upgrading.
There are three offers here:
New Product Website
We have put a new product website online please make sure you get a fresh new design. If you get the old site please clear your Browser Cache and DNS-Cache.
http://t4-editor.tangible-engineering.com/T4-Editor-Visual-T4-Editing.html
Download Locations
You can download the new 2.x versions (VS2010/VS11) and also the older 1.x versions (VS2008/VS2010) here:
http://t4-editor.tangible-engineering.com/Download_T4Editor_Plus_ModelingTools.html
Your Feedback is important to us
If you have any comment or feedback about the product and specially the new VS 11 Beta Support please do not hesitate to send us an email at support@tangible-engineering.com.
We wish you a lot of fun with the product
Tim Fischer CEO & Björn Borgsdorf CTO
Today we added C and C++ syntax highlighting for output code and updated the intellisense once more. Also added globalisation for “Transform on Build” feature so this now also works on non-english visual studio editions. Happy easter and enjoy 1.9.65!
]]>Let’s try the basics
1. I have installed tangible T4 Editor PRO EDITION
2. I created a C# project and added a Hello World.tt file to the project with the following content
3. Now I can set this simple template to transform on build – so each time the project is build it is run:
4. Let’s hit “Build” and see what is reported in the output window:
Now let’s do multiple output files within this auto-transform process
3. Create a second file TempalteFileManager.ttinclude. Then right click the Editor to open the Conext menu and select “Insert Code from Gallery”.
Then press the button “Search online templates” to find it. then insert its contents from the gallery.
4. Now go back to HelloWorld.tt and change its contents to
for (int i=1;i<3;i++){fm.StartNewFile("Class" + i + ".cs");
this.Write(System.DateTime.Now.ToString());}fm.Process(true); #>
5. And run it … cool i finally got this nice multiple output thing and transform on build running
Even more advanced: Generate into subdirectories and other projects:
var manager = TemplateFileManager.Create(this);
manager.CanOverrideExistingFile = false;
manager.StartNewFile("Class1.cs");
this.WriteLine("// Class is assigned to template ");
manager.StartNewFile("Class2.cs", folderName:"CodeFolder");
this.WriteLine("// Class is created in subfolder ");
manager.StartNewFile("Class3.cs", projectName:"ClassLibrary");
this.WriteLine("// Class is generated in Project ClassLibrary");
foreach (string item in fileNames) {
manager.StartNewFile(item, projectName:"ClassLibrary", folderName:"SubFolder");
this.WriteLine("// Classes are created in Project ClassLibrary/SubFolder ");
}
manager.Process();
Many thanks to Björn Borgsdorf and Rene Leupold who made this thing possible!
Happy Birthday Björn!
]]>Hi there,
we did post V1.962 which makes using our templates nicer in that sense as the templates are trusted by default. Furthermore a couple of issues with XPSP3 and also Cache location for Roaming users where fixed boosting performance for roaming users.
In addition Microsoft shipped ASP.NET MVC3 Tools Update which fix an compatibility issue when our tools are installed. See our forum for details.
Please let the feedback coming - we are doing another spring right now, addressing the most requested features and love to hear from you how the new installer works for you.
Best wishes from the Tangible T4 Editor Team
Tim Fischer, CEO tangible engineering GmbH
a) The MSFT Way:
Alternatively MSFT says that starting the command
Reset the Visual Studio 2010 experimental instance" (you'll find this command in the start menu | All programs | Microsoft Visual Studio 2010 SDK)
should work. And i think that way it should work with VS2008 also.
For me it did not always work so i came up with one more way to do it.
b) The tangible way:
In order to enable T4 Editor V1.9 in the experimental hive you have to copy over files and folders from the following folder:
C:\Users\<user>\AppData\Local\Microsoft\VisualStudio\10.0\Extensions
to C:\Users\timfis\AppData\Local\Microsoft\VisualStudio\10.0Exp\Extensions
Then start VS Experimental Instance goto Extension Manager and enable the new extensions.
]]>Update 16.April 2011: You will find new .ttinclude-based templates for generating multiple output files in the gallery. To use them create a file called .ttinclude and insert their code as shown below. Then reference this template from some tt-file and use as described in the documentation of the template..
Learn T4 by Example
We have posted new tutorials for T4 Text-Templates in the Gallery of the tangible T4 Editor. Now we have covered everything in there from basic syntax to generating from XML, UML or DSL Diagrams.
Here is how to get there
1. Download and install the tangible T4 Editor http://visualstudiogallery.msdn.microsoft.com/en-us/60297607-5fd4-4da4-97e1-3715e90c1a23
2. Create a project and then select "Add Item" select a "tangible T4 Editor" basic template to create a file
3. Then right click the editor pane to bring up the context menu there select "Insert Code from Gallery"
4. In the Gallery click the Search Online Templates button to get the templates
]]>We did now implement support for Environment Variables and Build Macros in assembly references e.g. $(ProjectDir)\$(OutDir)\MyDLL.dll for VS2010.
We did implement support for new template path resolution. If you have nested templates a.tt->b.ttinclude->c.ttinclude then in VS2010 you can use relative paths to refer from one template to another no matter of which directory they sit in.
We did change CTRL+F also to copy the current selected item into the box (much requested).
We now support Font Settings in VS2010 and pick up the default text font you set for your Core VS Text Editor.
The Vs2008 and VS2010 T4 Editor plus modelling tools are side by side compatible.
The next release will focus on DSL-Directive processor support for your own VS2010 DSLs as they changed in VS2010 and need some tweaking to make your life easier.
Last but not least
Tim Fischer, CEO tangible engineering GmbH, Stuttgart, Germany
You can get the bits here:
http://visualstudiogallery.msdn.microsoft.com/en-us/site/search?f%5B0%5D.Type=SearchText&f%5B0%5D.Value=t4+tangible
We are proud to announce the immediate availability of tangible modeling tools for VS2010 RTM. The new combined installer will install T4 Editor and modeling tools at once.
]]>A short notice that we did improve performance again and and also did add the item templates and template gallery and adjusted them to match VS2010 RTM bits. Same is true for the #pragmas we support now.
Stay tuned for more to come.
Get it here http://visualstudiogallery.msdn.microsoft.com/en-us/60297607-5fd4-4da4-97e1-3715e90c1a23
]]>Yes it is done! tangible T4 editor now works for VS2010 RTM. It is an important milestone for us. The free Edition is also updated. The commercial PRO Edition offering is also available with support and
12 months of updates for buyers.
We are very pleased to announce our support at the launch day and we are looking forward to many exciting new features we are adding over the next couple of weeks based on this new foundational release.
Get it now from the Visual Studio Gallery or Extension Manager
]]>A nice “Hello back” from the development team. We have been quite busy the last weeks to do side-by-side versions of tangible T4 Editor for VS 2010 and VS2008. Today we will ship V1.6 for VS2008.
What are the new features? Any fixes?
1. We do support T4MVC now!
We did fix a compatibility issues with the well known and loved T4MVC project. The Editor now works nicely with it.
2. We do support Code Libraries in T4 (Referenced Assemblies)
Many people have been using T4 plus C# DLL together to do code generation. When you import a C# DLL from T4 the DLL gets locked however when the T4 executed. To unlock it you must simply close the solution and reopen it. We do not lock the assembly anymore but VS still needs this little open/close play with your solution to unlock. We also now find the DLLs that are in your Output Dir (means referenced from your project that contains the T4).
>>Remember: To Unlock DLLs locked by VS IDE
used in a T4 template just
close and reopen the solution. <<<
Note we did redesign the whole assembly resolution and loading to make this happen.
3. Enhanced IntelliSense for C# 3.5 constructs
4. We do support the .t4 file ending better
We had a couple of issues with the .t4 ending they have all been resolved. Thanks for reporting!
5. We did a fix for users who wanted to generate “.js” code. This scenario crashed often before. Thanks for reporting!
6. A couple of minor enhancements and fixes to quality and speed.
You can get the band new bits here:
http://t4-editor.tangible-engineering.com/ (VS2008 and VS2010)
Speedy development – awesome design. With no code changes between Beta1 and Beta 2 the tangible T4 Editor in its current alpha bits form brings light to “.tt” files in Beta 2 right from the start.
Download and install instructions(Click here)
Go get it from the extension manager to start customizing code generation and wizards in VS2010 Beta 2 – Code Gen from the new cool Team System UML Diagrams, Entity Framework 2.0 and more…
In Visual Studio just go to Tools->Extension Manager and search for tools online. If you are an admin do not forget to click on the “Allow loading user extensions button".
Update: Here is a list of useful How-TOs from Tim Fischer
How To: Migrate T4 Text Templates from VS2008 to VS2010 Beta 2
How-To: Generate Code from Team System UML Diagrams in VS 2010 Team System Beta 2
]]>We have made a small update 1.5.02 for VS 2010 which is now available from Visual Studio Extension Manager. You can start the Extension Manager from inside VS 2010 via Tools Menu->Extension Manager. Then Click “Online Gallery” select the T4 Editor and Download. The restart VS 2010.
Alternatively: If you want it the old way, then you can download via download button from here. Then double click the VSIX file when VS2010 is closed. Note: .VSIX is a replacement for .msi for new VS2010 Addins.
Make sure that if you run VS as Admin or under XP that you do set the following checkboxes in the Tools->Options plus “Load Extensions from my local applications folder” – if you run VS as Admin.
I think we are again the first 3rd Party tool ;-)
Have fun!
Tim
]]>We updated both the VS2010 Beta1 and VS2008 Version to fix a known issue with intelli-sense when using inner classes. So make sure you get the latest build – also available from within VS2010 Beta 1 as an Update in the Extension Manager. Enjoy!
]]>You can install from the Visual Studio Extension Manager
Alternatively: If you want it the old way, then you can download via download button from here. Then double click the VSIX file when VS2010 is closed. Note: .VSIX is a replacement for .msi for new VS2010 Addins.
For more info about the features of the T4 Editor see this page. Note, that only the T4 editor is included - not the modeling tools.
In VS2010 Beta 1 Microsoft uses T4 now also in Entity Framework 4.0 and in the new Modeling Support of the Architecture Edition. Note VS2010 Beta1 now brings it’s own T4 item templates – so we did not put ours inside for now.
As usual you can find a sample T4 template for generating from the new VS2010 Use Case Diagrams in the build-in template gallery (VS 2010 Beta1 Section). Here are some cool screenshots and examples…
1. VS 2010 Beta 1 includes a ADO.NET EntityObject Generator
2. VS 2010 Beta 1 includes Modeling Diagrams which work with T4
3. Certainly also our template gallery works from within VS2010
Enjoy!
]]>We are excited to announce FREE T4 Editor with Intelli-Sense for all namespaces and MVC Host used in standard MS MVC 1.0 RTM Templates. In addition V1.4 added .t4 extension support for GAT/GAX users as well as an other number of performance improvements for large projects using #include statements.
Here are the screenshots of the FREE edition editing MVC T4 Templates with Intelli-Sense for those namespaces and the MVC Host build-in.
Here is the download of the tangible T4 Editor
Learn here how to customize T4 Templates for MVC.
We just posted a great series of “how do i?” videos about T4. They show the value of the in-product Online Template Gallery and Drag and Drop features very well.
Check out the videos
- T4 Video: Generate Data Transfer Objects
- T4 Video: Custom LINQ-to-SQL Classes via Drag and Drop
- T4 Video: Image Gallery via T4
- T4 Video: Generate multiple output Files with T4
- T4 Video: Generate Stored Procedures
- T4 Video: .NET Data Services Change Tracking
- T4 Video: T4 Editor #include-Directive
- T4 Video: Generate from XML File
- T4 Video: Generate from Diagram Files (DSLs)
- T4 Video: Share templates online with the build-in online T4 Gallery
We hope this helps.
]]>
After several years of support for T4, tangible engineering now has its own IntelliSense aware Editor for T4 that helps you create custom code generators baesd on your models, xml or DB-files.
With tangible's T4 Editor you can author your own Code Generator via Text-Templates (TT-Files) with IntelliSense, Syntax-Highlighting. T4 is a Microsoft Language for writing Code Generators which is similar to ASP.NET and is used by the Microsoft internally to build software and new features for .NET 4.0. The T4 Code Generation Engine is already built into Visual Studio - so the only thing that was missing is a good Editor and some free UML-style modeling tools.. so we shipped it.
Now it is up to you to accelerate your projects and start saving your company money by adopting T4 today and generate the code you need directly form diagrams, database schemas or xml files.